Template settings
- Former user (Deleted)
- spg bot
- Former user (Deleted)
This part of Agile Cards' interface is only accessible for Jira Admins and Project Admins.
General settings allow you to define the basics of your template.
Below is a visual reference of the options shown within template settings in Agile Cards - valid since v4.5.0
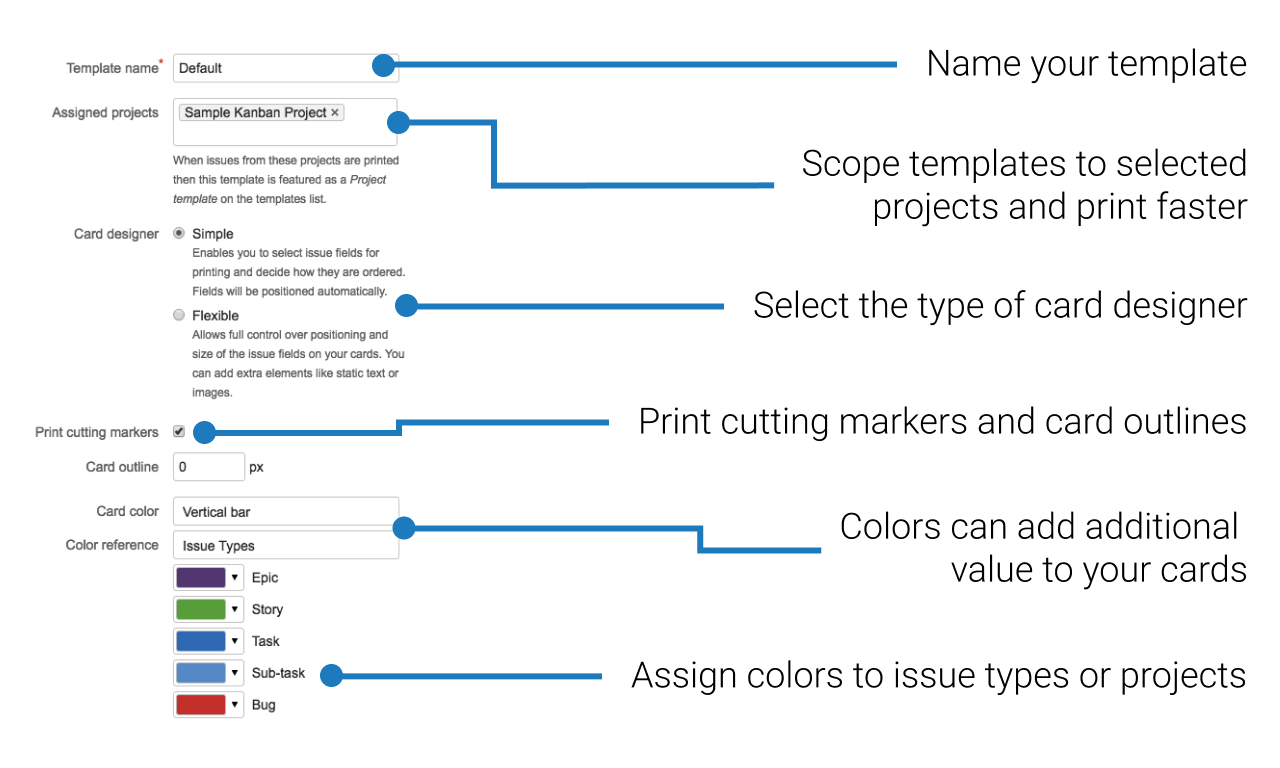
Template name
Each of the templates need to be named. The template name cannot be empty, aside from that you are free to use whatever name you want. The template name is the only required information which you have to provide while defining a new template.
Edit Permission
Agile Cards v4.5.0 introduced template management for project administrators, which defines a scope for which project administrators are allowed or not to edit templates. The permissions are only for editing the templates, every template is readable and printable for every authenticated user on Jira.
The options for editing permission are:
- All project admins: Every project administrator can edit this template
- Only admins of the assigned projects: Every project and jira administrator of the assigned projects for this template are allowed to edit it.
- Only user: Only the current user and jira administrators are allowed to edit this template.
Project administrators that have no access to edit a template can still clone it and create their own version of it.
Assigned Projects
Assigning a project to your template will enable quicker reference of that specific template when you have selected issues from the assigned project to print or save to PDF.
i.e. You won't waste time searching for a template when you want to print or save (PDF) issues selected from specific projects - particularly useful if you're on a bigger JIRA instance with many different project teams and templates.
To assign a project with a template, you can do so via the 'Assigned projects' field found within the template's settings tab (ref above).
Once a project is assigned to a template and you have selected issues to print from the corresponding project, the template will be automatically listed under the Project Templates submenu.
Card designer
There are two types of layouts you can choose from. Depending on the type of layout you will either gain on simplicity of design or the full control of the size and placement of the issue fields. For more details read on:
Card outline
Individual cards may look nicer if you addadditionalborder to them. The border is going to be printed in black color and will be of a defined line width. Putting "0" in this field makes the border disappear.
Cutting markers
It may be easier to cut the individual cards if you print them with cutting markers. The markers are printed in light gray color at the cards' intersections.
Color bars
Color bars hold additional information and do not take a lot of cards' space. Currently, color bars can be used to identify:
- issue types: each issue type identified in the system can be assigned with a different color
- projects: if your board is configured to span across multiple Jira projects you can tell the cards apart by assigning different colors to different projects
- priorities
Color bars can be positioned in three possible ways:
- as vertical lines of fixed width on the left side of the card
- as horizontal lines of fixed width at the top of the card
- as one of the fields, in which case you control the shape and size of the color bar in the Card Layout screen
Each color bar can have its own color defined easily. You can define separate color schemes for the templates that you have configured.
Have you configured all the aspects of your cards' look and feel? Great! It means you are ready to print them!
Not sure? See what else you can configure.