Webhooks configuration
URL Change
The application URL for Power Scripts for Jira Cloud is changing from pscloud.cprime.com to pscloud.anova.appfire.app on May 20th, 2023. In order to prevent any disruption of your existing webhooks you should update to the new URL. The old URL will be temporarily redirected to the new URL for some period of time. However, this change requires a brief down-time and there is no guarantee how long the redirect will remain in place. To ensure there is no disruption in your services the URL should be updated on, or closely after May 20th. Thank you for your understanding.
Looking for the documentation on the newest versions of SIL Engine and the Simple Issue Language for Jira 8 for Server/Data Center? Click here !
Availability
This feature is available starting with v4.5.0.
Webhooks summary
Webhooks give you the possibility to run existing SIL scripts from outside of the Jira / Confluence instance, by using a REST/HTTP client and retrieve the results of the run script.
In order for this to be possible, you need the following things:
- Create a SIL script.
- Configure a webhook to run that SIL script.
Creating a SIL script
You can use almost any SIL script but the two Webhooks specific SIL routines getWebhookPayload and appendToWebhookResponse are especially powerful with this feature.
Example 1 - Getting the Webhooks payload from the calling client and returning custom results and HTTP response code
//getting the REST/HTTP call input parameters:
WebhookPayload httpRequestPayload = getWebhookPayload();

//getting the used HTTP method:
string httpMethod = httpRequestPayload.httpMethod;//This can be something like "GET", "POST", "PUT" etc.

//getting the http request payload (body):
string httpPayload = httpRequestPayload.payload;

//getting the http query parameters:
WebhookParam[] httpQueryParams = httpRequestPayload.queryParams;
string firstQueryParamName = httpQueryParams[0].name;
string firstQueryParamValue = httpQueryParams[0].values[0];

//sending the response back to the caller:
appendToWebhookResponse("http method:");
appendToWebhookResponse(httpMethod);
appendToWebhookResponse("payload:");
appendToWebhookResponse(httpPayload);
appendToWebhookResponse("firstQueryParamName:");
appendToWebhookResponse(firstQueryParamName);
appendToWebhookResponse("firstQueryParamValue:");
appendToWebhookResponse(firstQueryParamValue);

//returning a HTTP status code:
return true, 200;
The format for the return line. If used, it should return <true|false>[, <HTTP status code>];
The first argument can only have the 'true' or 'false' values. 'True' means that the script was run correctly, and 'false' means that the script encountered a problem when it was run.
NOTE
It is highly recommended that you use valid HTTP status codes.
Webhooks configuration
To define what URI and HTTP method(s) will be used to invoke a specific SIL™ script, use the SIL Webhooks configuration.
- Log in to your Jira as Admin.
- Go to your Administration > Add-ons > CPRIME PLUGINS CONFIGURATION > SIL Webhooks Configuration.
- To create a Webhook entry, click the the Add webhook button.
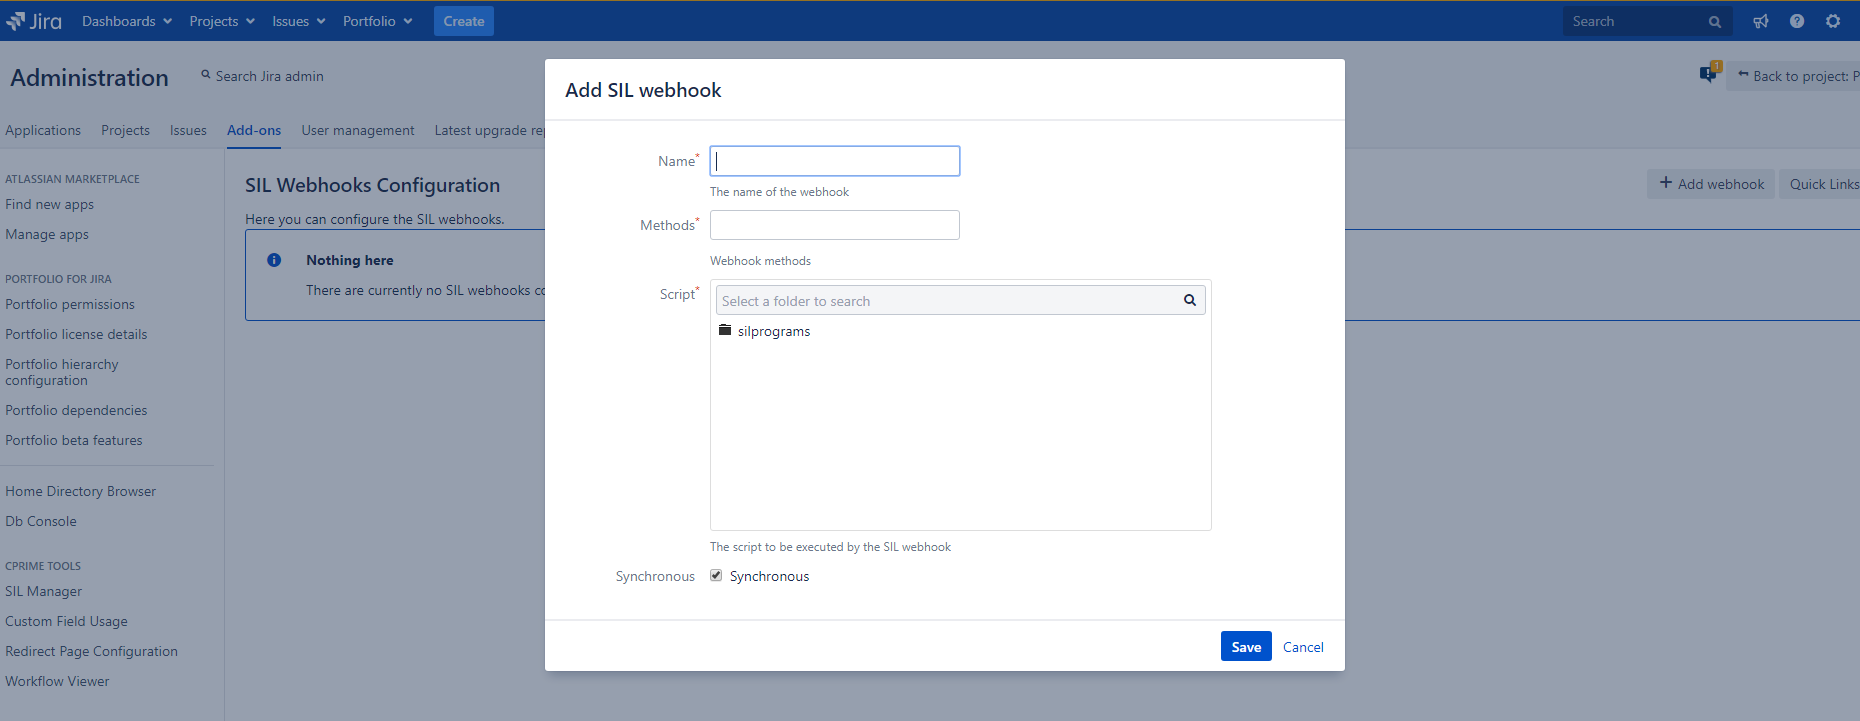
A screen like the following will appear: - Fill in the parameters in the form:
- Name - the name of the webhook. This will be used as an identifier for the webhook configuration.
- Methods - the HTTP method (or methods) to bind the webhook to.
- Script - SIL™ script that will run when calling this webhook.
- Synchronized - the sync/async configuration for the webhook.
NOTE
The difference between synchronous and asynchronous is that the asynchronous Webhook SIL call can't return any results or custom HTTP codes to the caller. This happens because the SIL script run task is added to a list of future tasks to be run, and the HTTP call ends.
With the synchronous option, the call will block until the SIL script run is completed, and the results will be returned to the caller.
- Save the configuration.
After you save the configuration, a new entry like the following one will show up:
The URI column in the table will help you run your newly created webhook. For example if your Jira installation instance is located at http://localhost, you can run the webhook using the http://localhost/rest/keplerrominfo/refapp/latest/webhooks/mysilwebhook/run address with the selected HTTP method(s).
You can access the webhook configured in this example image using the HTTP methods GET and POST.
Changes are visible immediately and the webhook is ready immediately.
If you configured the Webhook to be available for the GET HTTP method, you can test the webhook in the browser, giving it custom query parameters, and the result could look something like this (the above SIL script was used):
NOTE
In Power Scripts for Cloud, the prefix for the above link should be the add-on URL (https://pscloud.cprime.com/refapp). Also, the JWT query parameter will be needed, and will be accessible from the SIL webhook script.
More details about how the JWT works are here.
If you can't find out how to generate one by yourself, the easiest way to get one is to open one of our pages from the SIL Manager's Quick Links menu (for example, the SIL Webhooks Configuration) in a new tab and copy it from that URL directly.
Note that you'll have to consider this parameter in your SIL script as well.
WARNING: The JWT will not appear in the URL when opening a page from the Jira Admin side bar menu, only when opening from the quick links.
Webhooks authentication
For the REST/HTTP client to be able to make any Webhooks calls, it needs to be authenticated into the Jira / Confluence instance.
Please refer to the Atlassian Security pages for information on the authentication:
- https://developer.atlassian.com/server/jira/platform/basic-authentication/
- https://developer.atlassian.com/cloud/confluence/basic-auth-for-rest-apis/
See also


