Send Email To Page Server - User Guide
- Stacy Coakley
- Ture Hoefner (Deactivated)
- Ameen Mustafa
Send emails to Confluence to create pages, blogs, comments, and attachments. Each page can have its own email address. Emails are received by the email server that you have configured for this plugin.

Demo
Features
- Ability to create pages, blogs, comments, and attachments by sending emails to pages
- Allows pages to have unique email addresses
- Customize how often the app checks for mail
|
|
|
|
|
|
|
User Guide
Quick Start
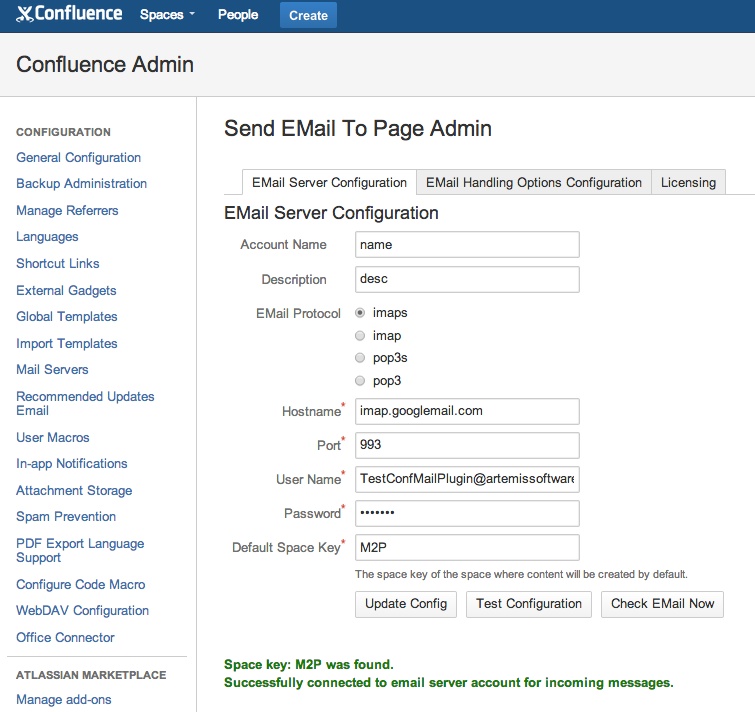
Emails will be received by the incoming email server that you have configured in Confluence administration → Send Email to Page Admin → email Server Configuration.
If you have a Gmail account and want to quickly configure Send Email to Page to experiment with it you can configure your Gmail account to allow IMAP or POP clients to connect and use the Gmail domain and port in your plugin configuration settings:
- Check Gmail through other email platforms (IMAP)
- Read Gmail messages on other email clients using POP
Google has recently started denying connections for apps that use basic authentication (username/password), even when it is done over SSL. Basic auth is the mechanism used by the Send Email to Page application. Google requires enabling "Less secure app access" for your Google account for such connections to be made. See https://support.google.com/mail/answer/7126229 for instructions for less secure app access and for DisplayUnlockCaptcha to get your Google account to allow this app to connect to it.
When the EMPLG-129 enhancement request for allowing OAuth connections is completed then basic authentication will no longer be the only option for connecting with this app.
The SendToPageEmailAddressXHTML macro will render an email link that will open an email client that can be used to compose an email to the page on which the macro is inserted (Creating a link for a page's unique email address). This can be done to perform operations like adding a comment, attachment, or label to the page or to add content to the body of the page.
For a quick start:
- use the Send Email to Page admin tool to configure your incoming email server account info and your default space key
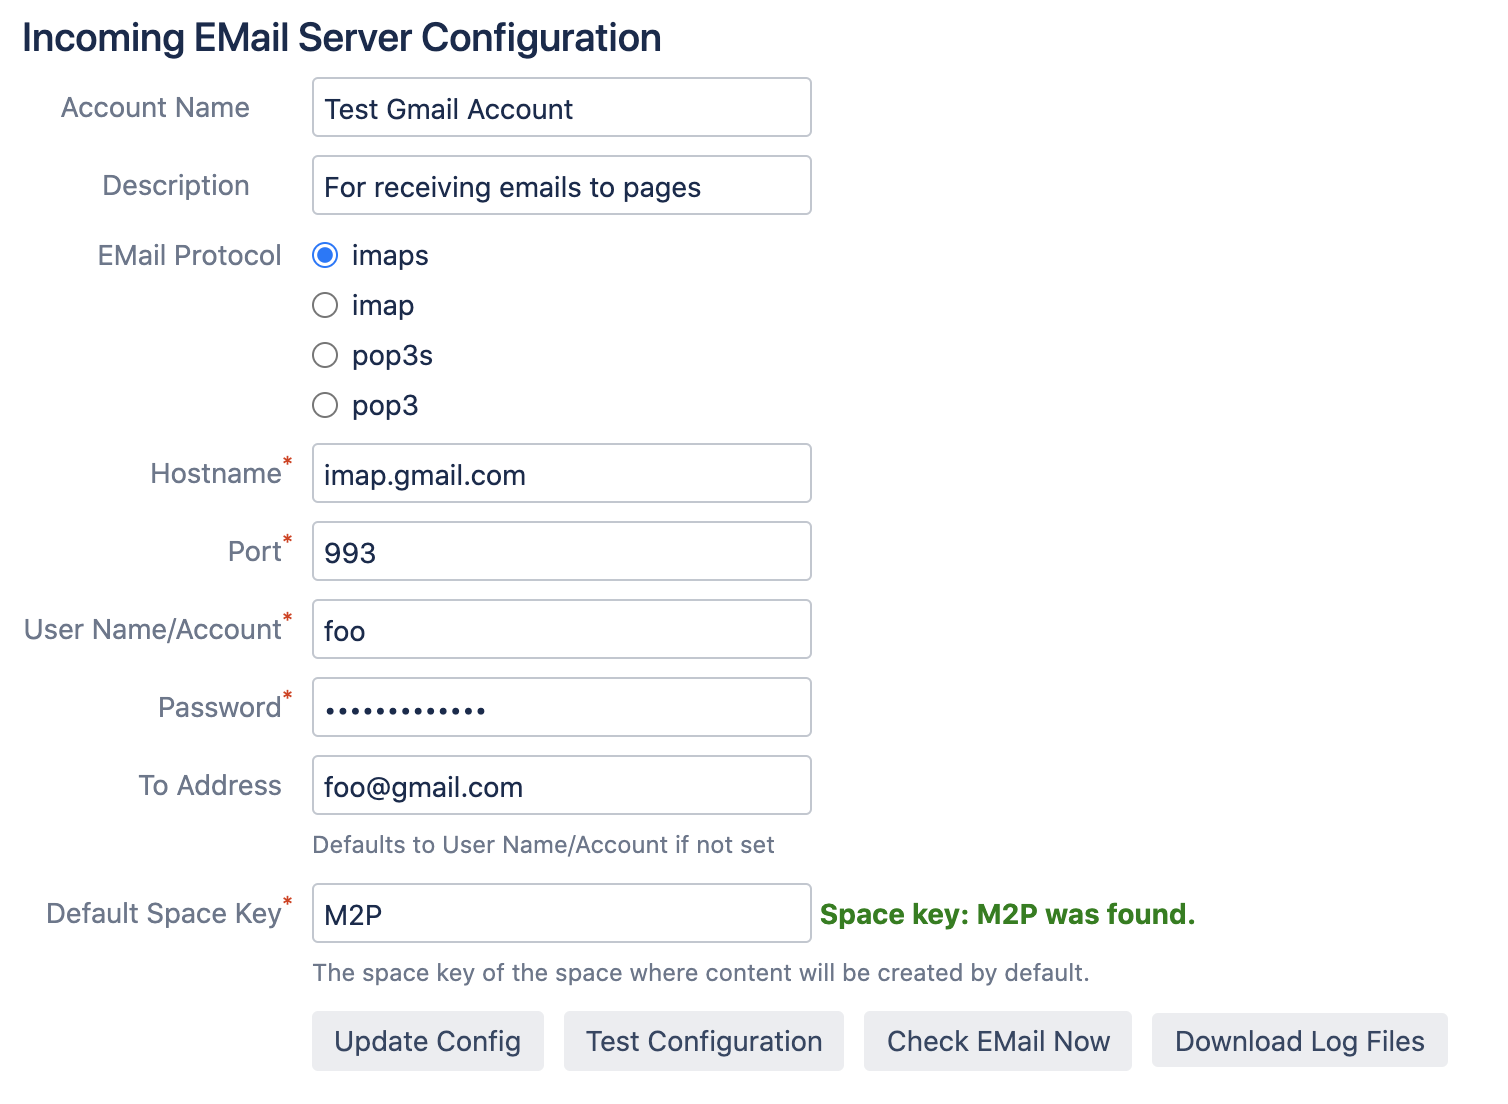
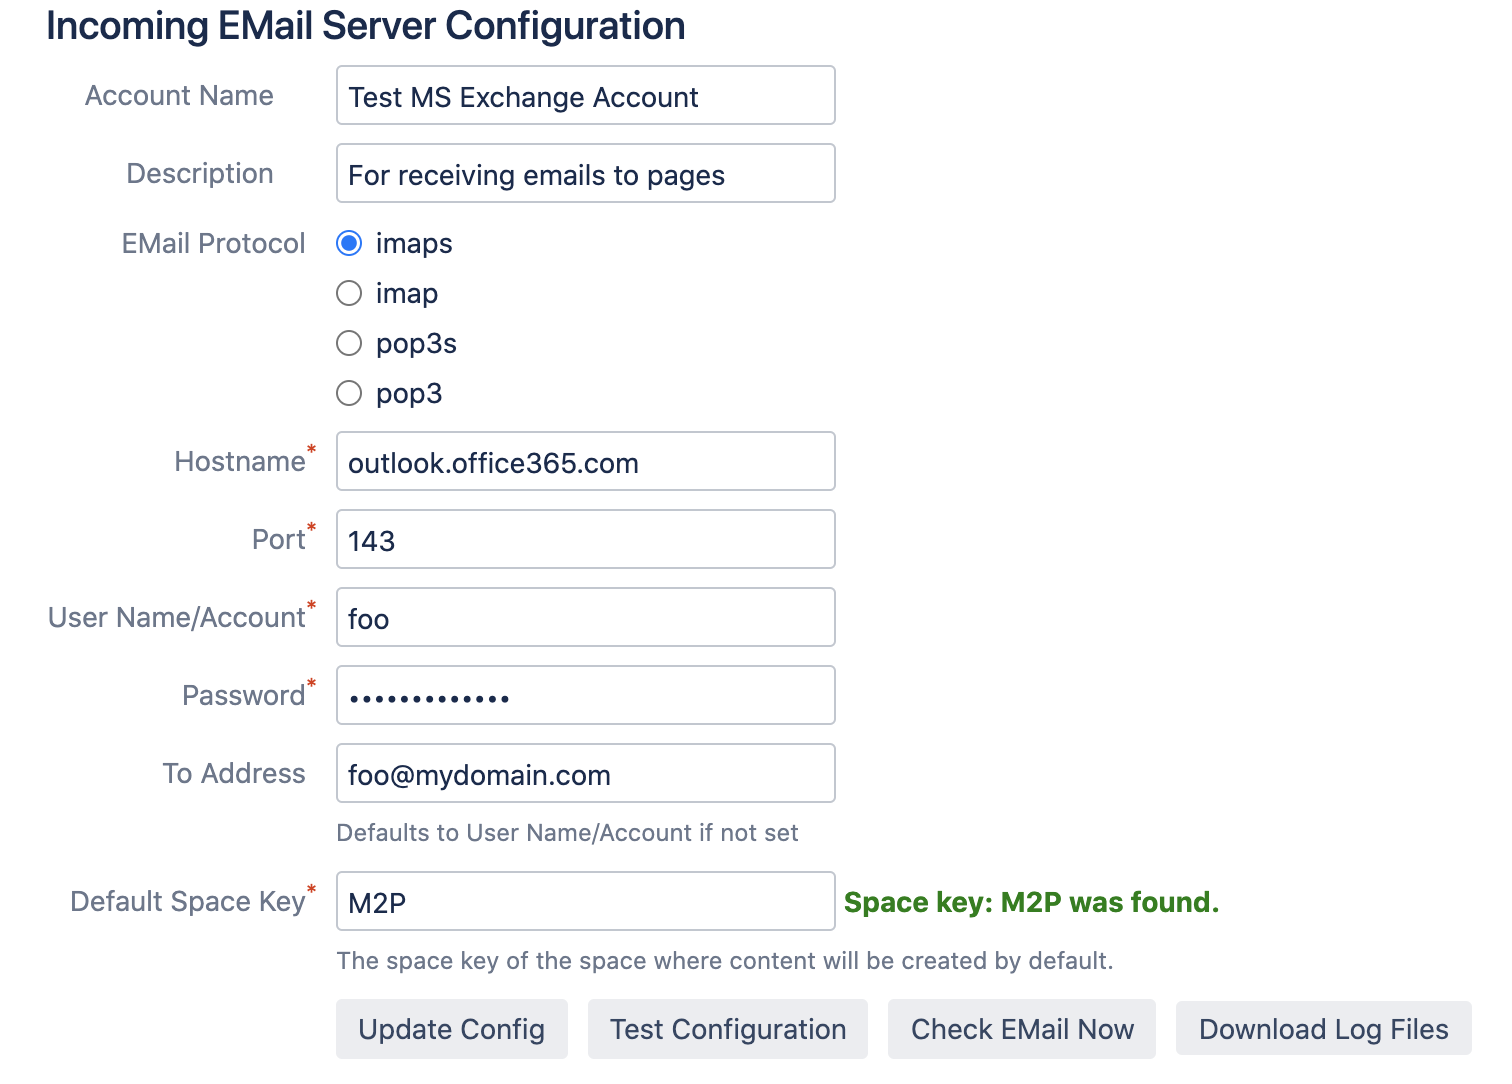
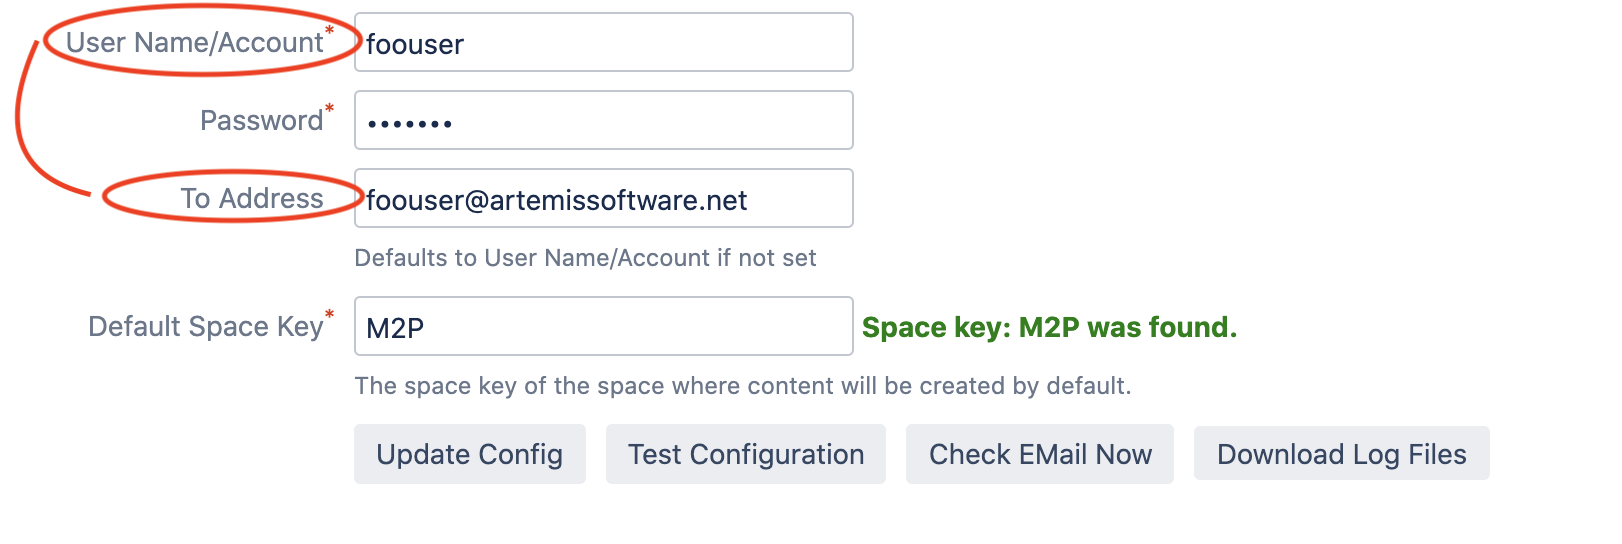
- The "To Address" should be set to the email address for the "User Name/Account" that you have set. The username/account is used to connect to the incoming email server and the "To address" is used to find emails in that account's inbox that are to/cc/bcc the "To Address" for that account.
- send an email with the subject "My New Page" to your configured incoming email server
- the content of the email can be text/plain or text/HTML and it will become the content on a new page titled "My New Page" in your default space
- attachments to the email become attachments on the page
- inline images in the email content become inline images on the page and the images are attachments to the page
- get fancy and add a command tag anywhere in the body of the email like <M2P:labels=help,history/> and those labels will be on your new page
For another quick start:
- see the Email to this Page.. page menu item.
- You can get email addresses without using the SendToPageEmailAddressXHTML macro when you use the menu item.
- If your admin has not enabled that feature or your email server does not support "plus addressing" then see the Usage Examples for other ways to address and compose emails for this app.
"plus addressing" is specified in RFC 5233.
Plus addressing is a mechanism for specifying extra information in an email address.
For example, for an address like testSendEMailToPage@gmail.com you could add information like this: testSendEMailToPage+12779714+comment@gmail.com.
That "plus address" would be sent to testSendEMailToPage@gmail.com (if the incoming email server supports plus addressing).
This application can parse the extra information out of the plus address to see that the user wants to add a comment to the page with ID 12779714.
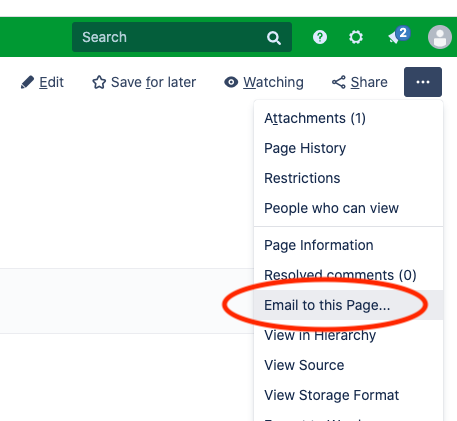
Email to this Page...
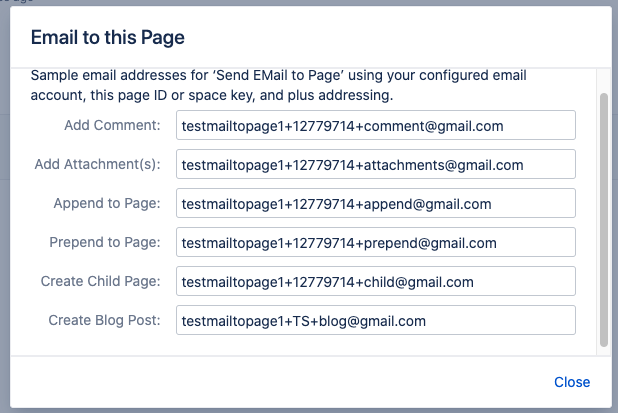
The "..." menu for pages includes an "Email to this Page..." menu item that can be used to quickly get email addresses for performing various operations ("Add Comment", "Add Attachment(s)", "Append to Page", "Prepend to Page", "Replace Page", "Create Child Page", "Create Blog Post").
This feature is enabled by default for logged in users. To disable this feature for everyone the admin can use the "Disable Email to this Page Menu Item" setting in the admin configuration tool for this app. This feature uses plus addressing so admins may want to disable it if they are using an incoming email server, like MS Exchange, that does not support plus addressing.
To use this feature, copy the email address and paste it into your email client that you use for composing emails. In the future, these email addresses will be rendered as "mailto:" links so that they can be clicked on to automatically open your email client with the address populated (See EMPLG-138).
After you paste the address into your new email in your email client then fill out the subject and the body of the email. For example, for adding a blog post the subject becomes the subject of the blog post and the body becomes the body of the blog post. For adding a comment, the subject is not used and the body becomes the comment. Try it!
After you send your email, navigate to the "Send EMail to Page" admin tool and click the "Check Email Now" button to immediately check the incoming email server. If you don't have admin privileges then wait up to 5 minutes for the scheduled job to automatically check for you.
Notice that the email addresses in the "Email to this Page..." dialog use "plus addressing" (specified in RFC 5233). Plus addressing is a mechanism for specifying extra information in an email address. For example, for an address like testSendEMailToPage@gmail.com you could add information like this: testSendEMailToPage+12779714+comment@gmail.com. That "plus address" would be sent to testSendEMailToPage@gmail.com and this application can parse the extra information out of the plus address to see that the user wants to add a comment to the page with ID 12779714.
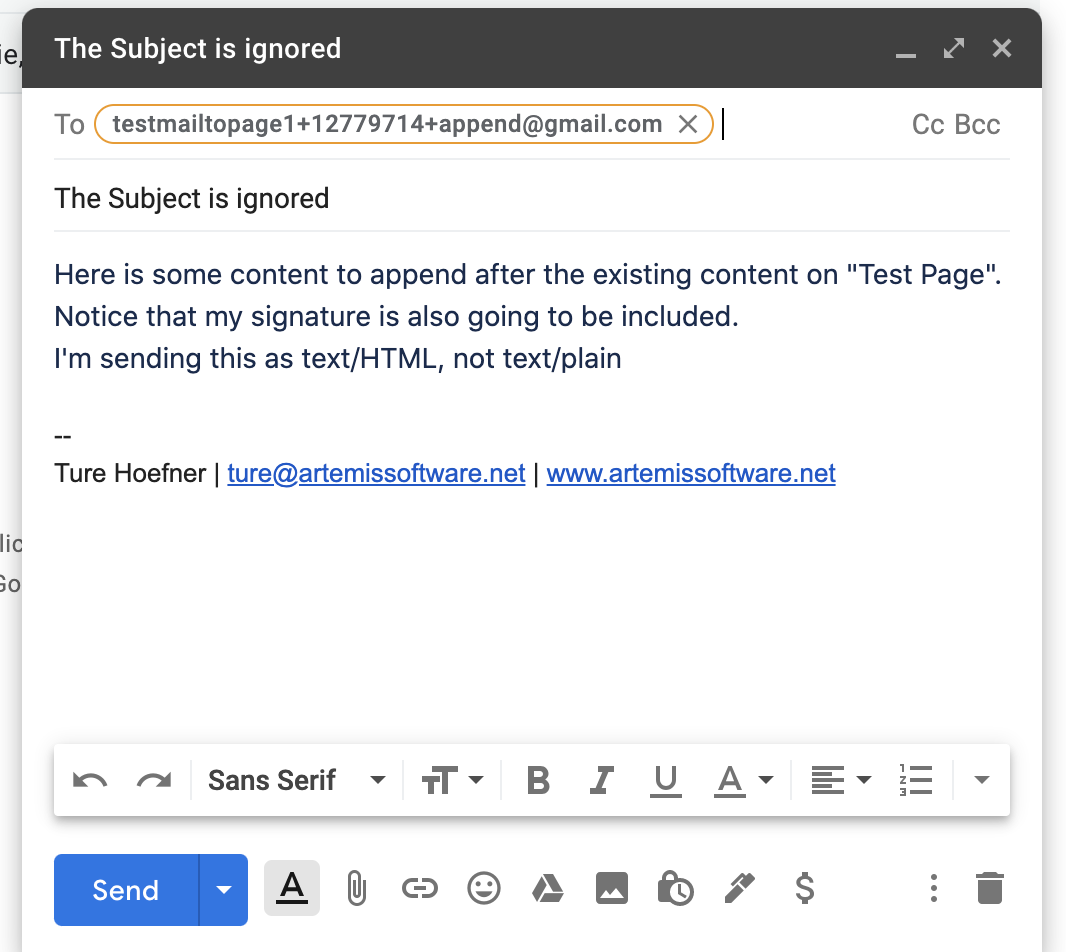
For example, to append content to an existing page, use the "Append to Page" address. Copy it, paste it into your email as the address, and compose your email:
Configure Your Browser to Open Email Client for Click on Email Link
Your users may need to configure their browser to open the desired email client when clicking on a mailto link.
For example, to configure your browser to open Gmail see How to Set Gmail as Your Browser's Default Email Client for Mailto Links
Creating a link for a page's unique email address using the macro
You can edit an individual page to create a link used to send an email to the page or you can customize a page template globally or for a specific space to create an email link for all pages. The SendToPageEmailAddressXHTML macro will render an email link to open an email client that can be used to compose an email to the page on which the macro is inserted. The email will be received by the email server that you have configured in Confluence administration → Send Email to Page Admin → email Server Configuration.
For example, this code for instantiating a SendToPageEmailAddressXHTML macro can be inserted into a template used to render your Confluence pages:
<center>Send email to page: $helper.renderConfluenceMacro("{SendToPageEmailAddress}")</center> |
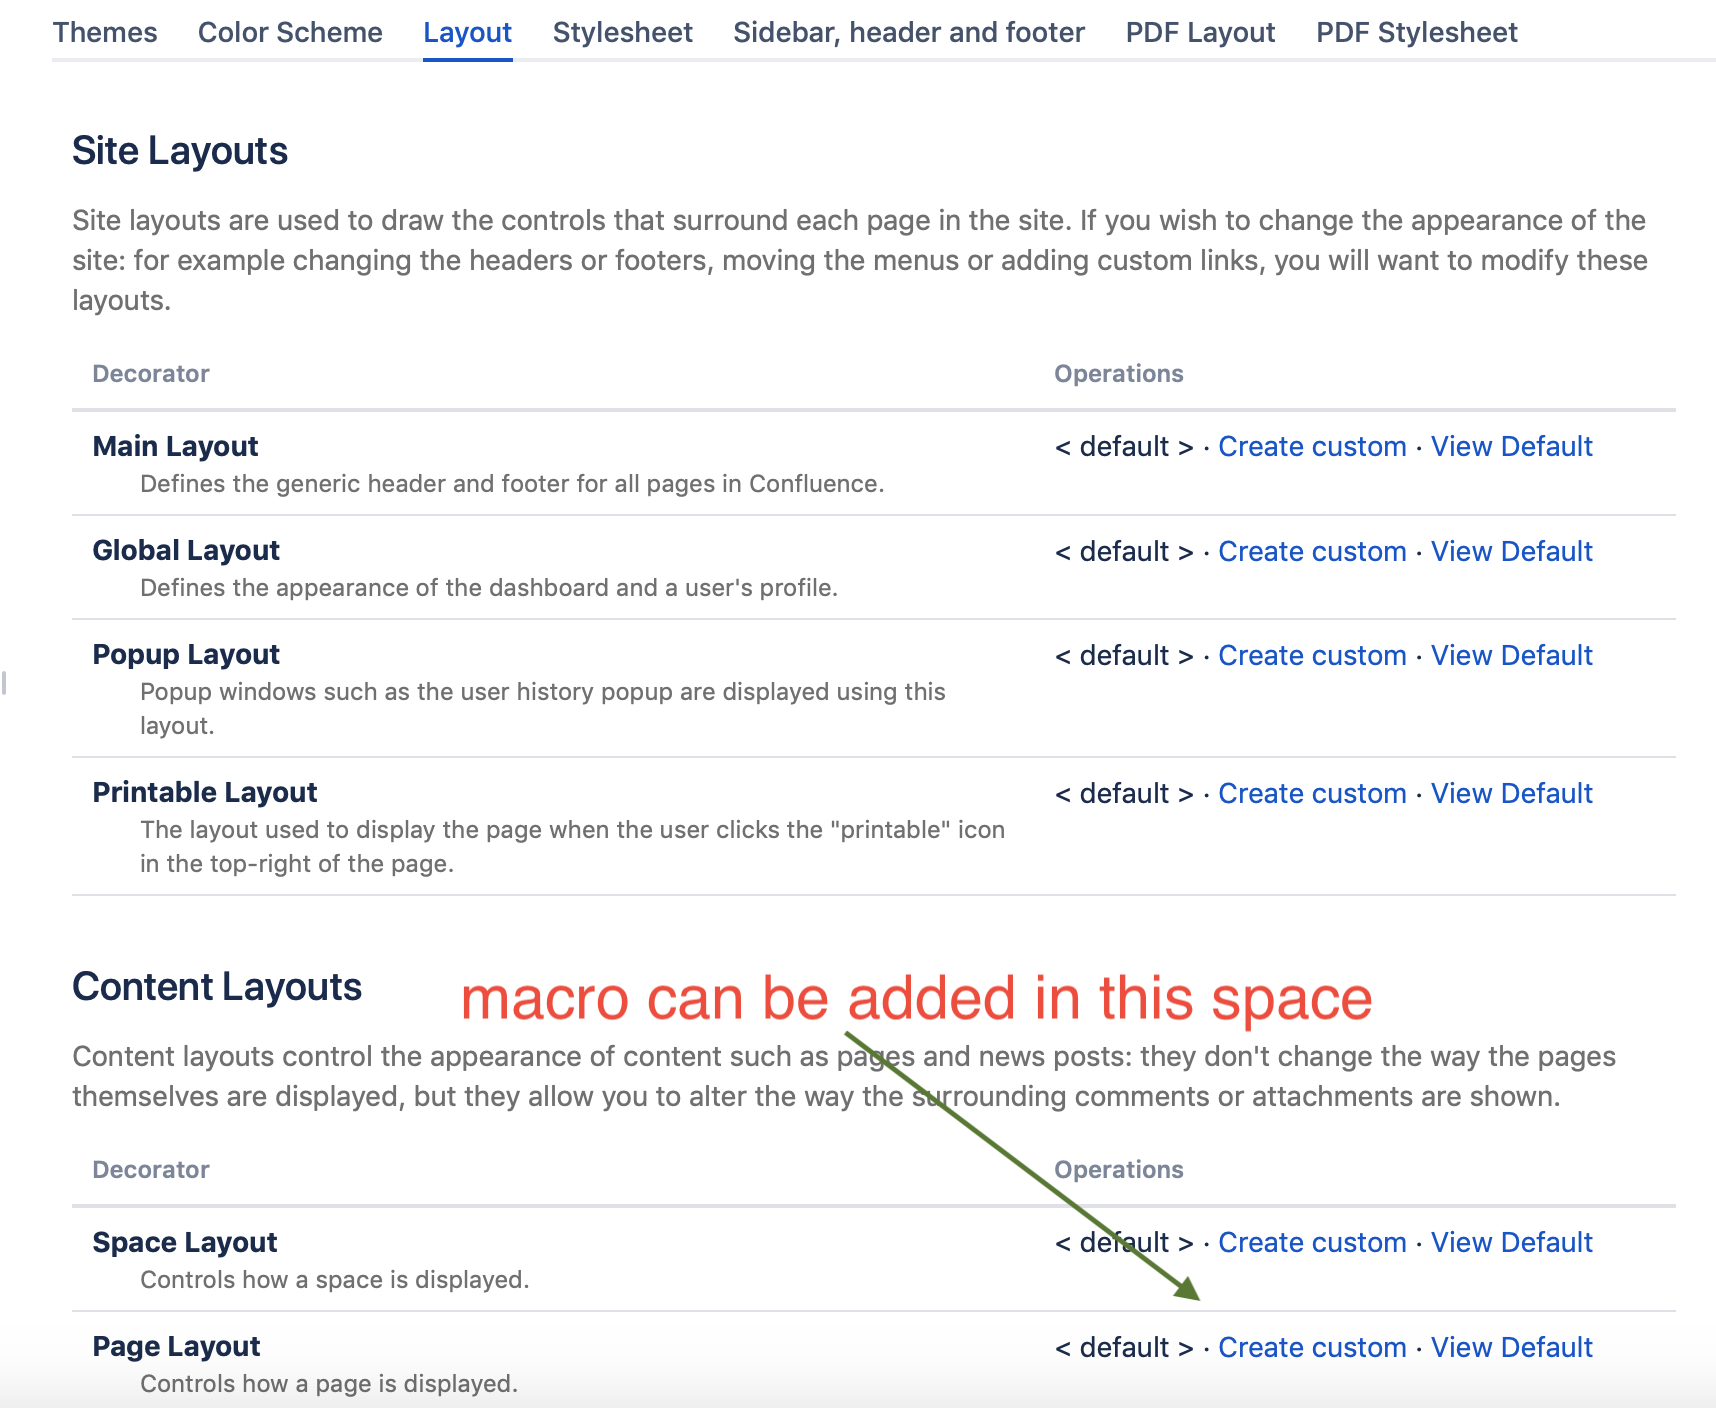
You could add that code snippet to the "Page Layout", accessed via Space Tools:
- Space Tools → Look and Feel → Layout → Content Layouts → Page Layout
Here is a video showing how to add an email link to the footer of each page in a space:
If you are using the popular "Documentation Theme" you can put this in the Footer to render an email link:
{SendToPageEmailAddress} |
Usage Examples
Most of these examples require that you understand "plus addressing" (specified in RFC 5233). Examples that do not use plus addressing are towards the end of the usage examples.
Plus addressing is a mechanism for specifying extra information in an email address. For example, for an address like testSendEMailToPage@gmail.com you could add information like this: testSendEMailToPage+12779714+comment@gmail.com. That "plus address" would be sent to testSendEMailToPage@gmail.com and this application can parse the extra information out of the plus address to see that the user wants to add a comment to the page with ID 12779714.
Another concept to understand is Command Tags, which are used to insert instructions into the email subject or body, like:
<M2P:labels="help,history"/>
Create a New Page (plus addressing)
Use the ID of the parent page (preferred method)
Email Details:
To: my.account+12779714+child@gmail.com
Subject: My New Page
Body: content of my new page
What happens
- A page is created as a child of the page whose ID is 12779714
- The new page has a title of "My New Page"
- The new page has body text: "content of my new page"
- You could inline or attach attachments to the email and they will be inlined in the page body content or attached to the page
- You could use a command tag in the body of the email to add labels to the page: <M2P:labels=support,history/>
Create a New Page (command tag)
Email Details:
Subject: Doesn't matter
Body: <M2P:parent=12779714:title=My New Page:contentType=page:action=child/>content of my new page
What happens
- A page is created as a child of the page whose ID is 12779714
- notice that action=child is required so that the app knows that you are adding a child page to the specified parent, as opposed to doing something like adding attachments (or comments, ...) to the specified parent.
- The new page has a title of "My New Page"
- You could put the page title in the email Subject and not use the "title" command tag parameter
- The new page has body text: "content of my new page"
- You could inline or attach attachments to the email and they will be inlined in the page body content or attached to the page
- You could add to the command tag to add labels to the page: <M2P:parent=12779714:title=My New Page:contentType=page:labels=support,history/>
Create a New Page (use defaults)
Email Details:
Subject: My New Page
Body: content of my new page
What happens
- A page is created as a child of the home page of the Default Space Key that you have configured in the admin tool
- or you could override the default space and specify it with a command tag like <M2P:space=DS/>
- or as a child of the "Default Parent Page" if that is configured in the admin tool
- or in the sender's personal space if "Send EMail to Personal Space..." is enabled in the admin tool
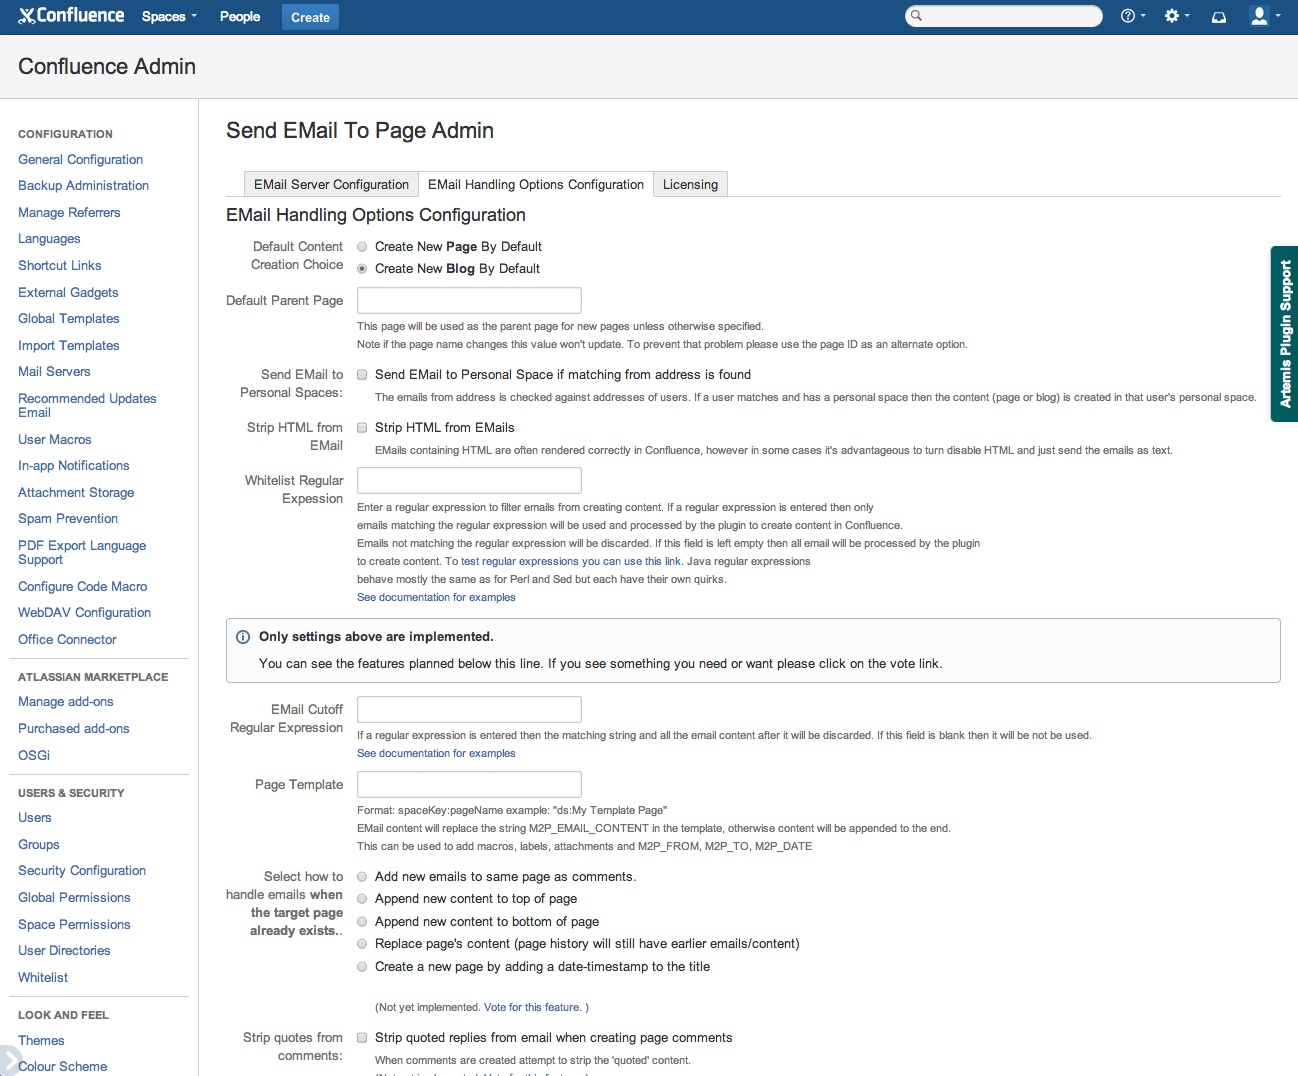
- or if you have enabled "Create New Blog By Default" then it will create a Blog Post instead of a page
- The new page has a title of "My New Page"
- The new page has body text: "content of my new page"
- You could inline or attach attachments to the email and they will be inlined in the page body content or attached to the page
- You could use a command tag in the body of the email to add labels to the page: <M2P:labels=support,history/>
- It is not recommended that you depend on defaults like this. As you can see, the behavior is complex and depends on what kind of defaults you have specified in the admin tool. Why not be explicit with your emails? Use plus addressing or command tags.
Add an Attachment to Page (plus addressing)
Use the ID of the page (preferred method)
Email Details:
To: my.account+12779714+attachments@gmail.com
Subject: Doesn't matter
Body: doesn't matter
Attachments: attach whatever you want to attach to the page
OR, use space key and page name in the email address as in the earlier example and (not the preferred method)
Add Comment to Page (plus addressing)
Use the ID of the page (preferred method)
Email Details:
To: my.account+12779714+comment@gmail.com
Subject: Doesn't matter
Body: some comment about this topic
- You could inline or attach attachments to the email and they will be inlined in the comment or attached to the page
Append Body Content to Page (plus addressing)
Email Details:
To: my.account+12779714+append@gmail.com
Subject: Doesn't matter
Body: content to append to the existing body of the page
What happens
- The content "content to append to the existing body of the page" is appended to end of the body of the page whose ID is 12779714
- You could inline or attach attachments to the email and they will be inlined in the content or attached to the page
- You could use a command tag in the body of the email to add labels to the page: <M2P:labels=support,history/>
Prepend Body Content to Page (plus addressing)
Email Details:
To: my.account+12779714+prepend@gmail.com
Subject: Doesn't matter
Body: content to prepend to the existing body of the page
What happens
- The content "content to prepend to the existing body of the page" is prepended to beginning of the body of the page whose ID is 12779714
- You could inline or attach attachments to the email and they will be inlined in the content or attached to the page
- You could use a command tag in the body of the email to add labels to the page: <M2P:labels=support,history/>
Replace Body Content of Page (plus addressing)
Email Details:
To: my.account+12779714+replace@gmail.com
Subject: Doesn't matter
Body: content to replace the existing body of the page
What happens
- The content "content to replace the existing body of the page" becomes the new body of the page whose ID is 12779714
- You could inline or attach attachments to the email and they will be inlined in the content or attached to the page
- You could use a command tag in the body of the email to add labels to the page: <M2P:labels=support,history/>
Create a New Blog Post (plus addressing)
Email Details:
To: my.account+DS+blog@gmail.com
Subject: Title of My Blog Post
Body: content of my blog post
What happens
- A blog post is created in the space with space key = DS
- The title of the blog post is "Title of My Blog Post"
- The content of the blog post is "content of my blog post"
- You could inline or attach attachments to the email and they will be inlined in the blog post or attached to the blog post
- You could use a command tag in the body of the email to add labels to the blog post: <M2P:labels=support,history/>
Create a New Blog Post (command tag)
Email Details:
Subject: Title of My Blog Post
Body: <M2P:space=DS:contentType=blog/> content of my blog post
What happens
- A blog post is created in the space with space key = DS
- The title of the blog post is "Title of My Blog Post"
- The content of the blog post is "content of my blog post"
- You could inline or attach attachments to the email and they will be inlined in the blog post or attached to the blog pos
- You could add to the command tag in the body of the email to add labels to the blog post: <M2P:space=DS:contentType=blog:labels=support,history/>
Sending emails to existing pages using default actions
Emails can be sent to existing pages without specifying an action (comment, prepend, append, ...). This feature may be used when you want replies to emails to perform actions on the page that was created by the first email.
The idea is that any email that can be used to create a page or blog can be replied to or forwarded to perform an action (comment, etc.) on the page/blog that was created by the first email.
In an email composed from scratch, you could explicitly specify a parent page/blog and an action but this feature for actions on existing pages using default actions is for the "reply or forward" scenario.
In the admin tool the admin can specify the default action for emails to existing pages/blogs when the action is not specified in the email:
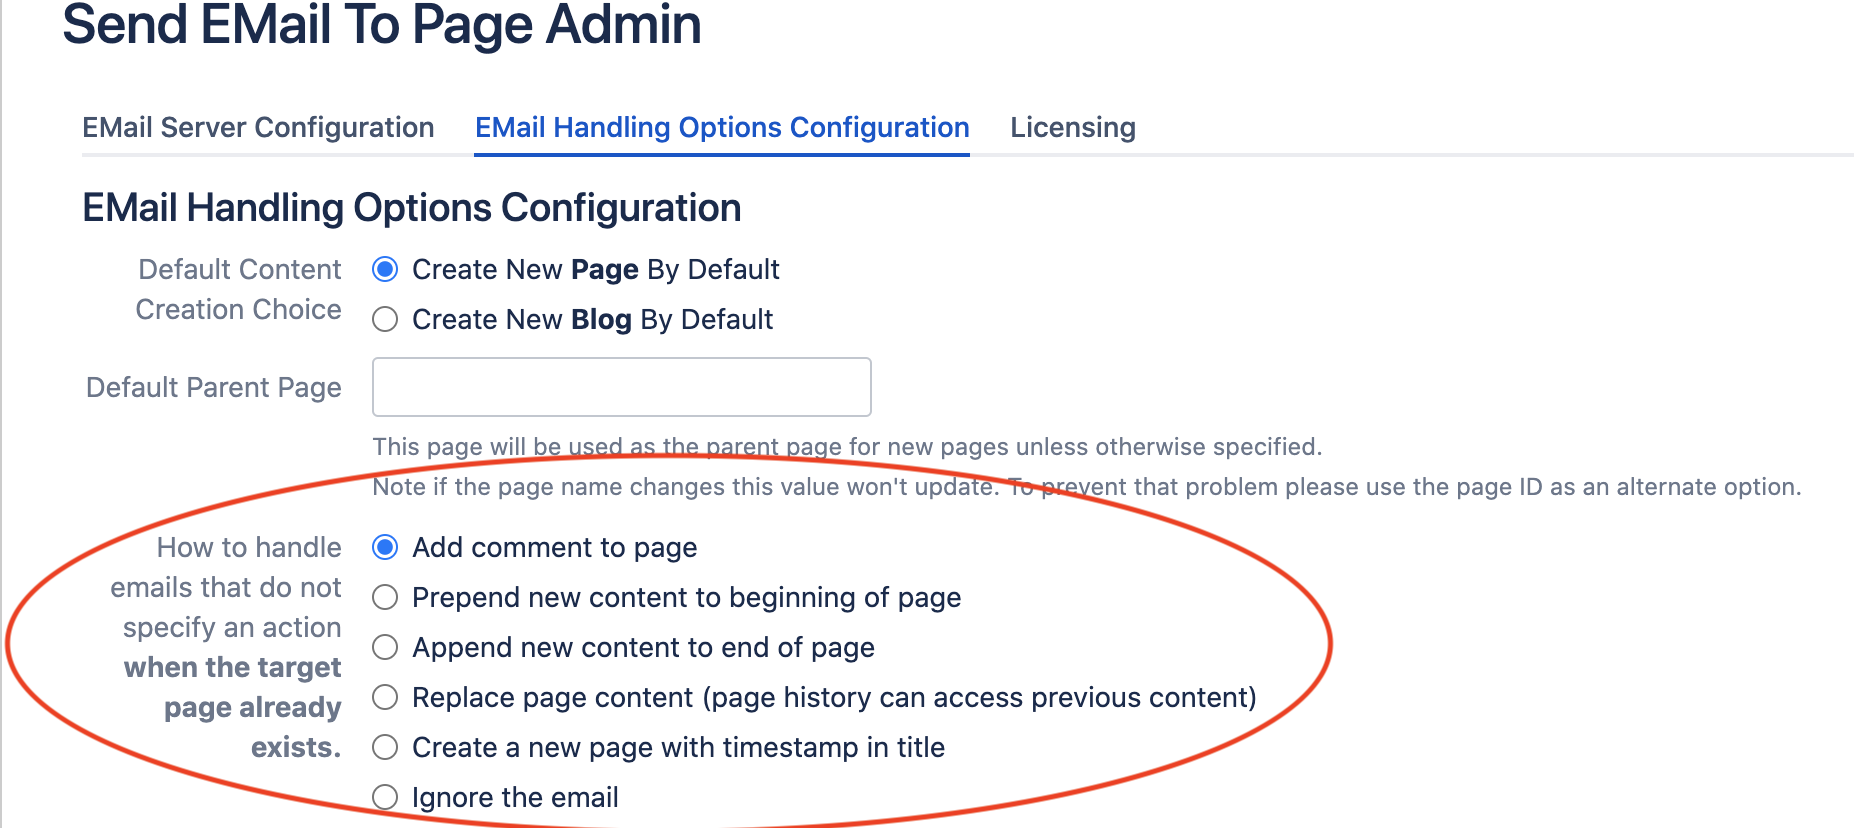
You can always use plus addressing or command tags to explicitly define the action to perform on an existing page but the 'default action' feature is one way to allow users to reply to emails without needing to know anything about plus addressing or command tags and still have some action be performed on your site. The subjects for reply emails that have common prefixes like "re:", "Re:", "RE:", "fwd:", "Fwd:" will have that stripped from the subject before it is used for something like matching the title of a page.
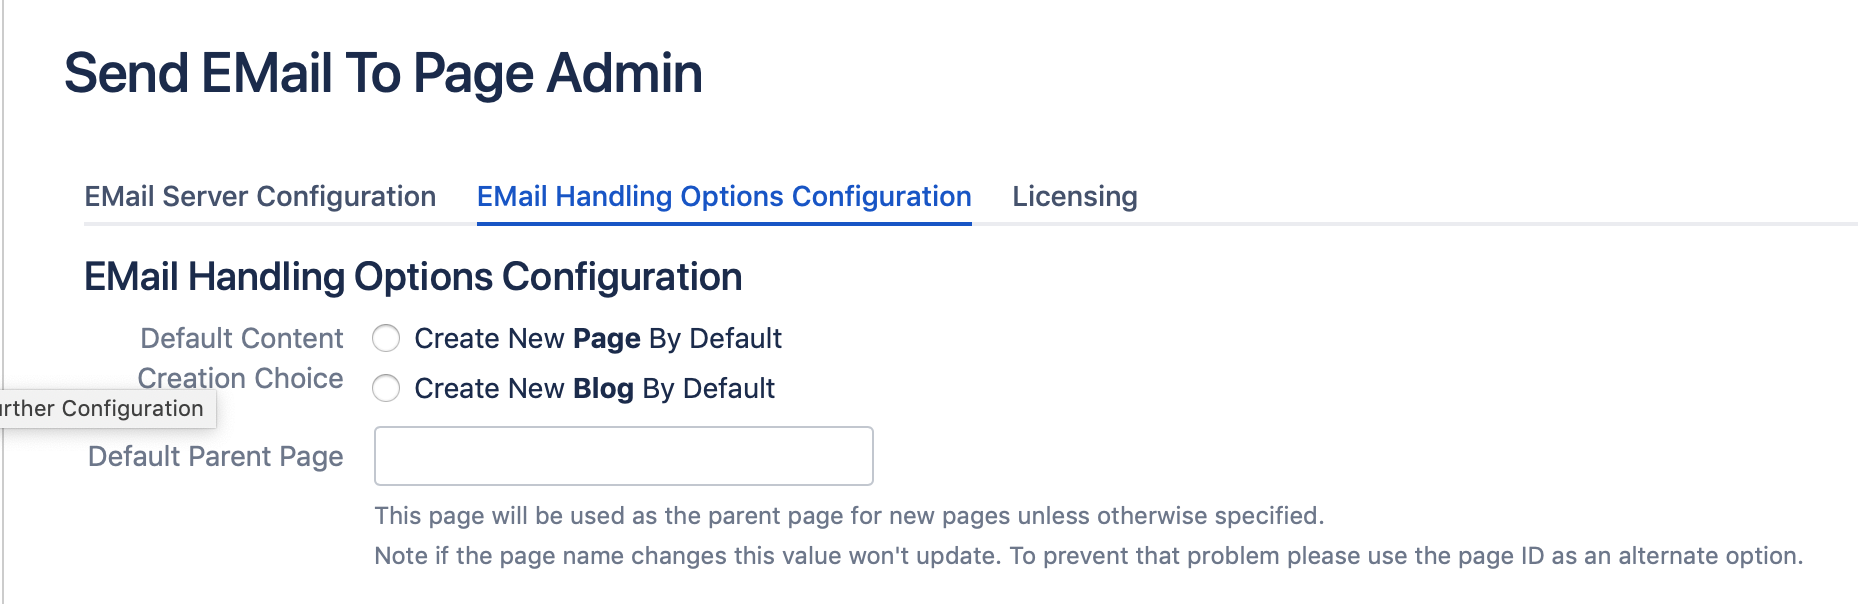
Sending an email to a defined 'Default Parent Page'
The default parent page can be defined on the admin tab "Email Configuration Handling Options"
Using Command Tags
Command tags allow a user to embed M2P 'tags' into the email to achieve a wide variety of behavior including creating pages and blog posts and adding labels, attachments, and comments to existing pages and blogs. Command tags can also prepend, append, or replace content on an existing page/blog content.
Command tags are one way to send emails that do not use any plus addressing.
Command Tag Description
A "command tag" is a string you can put into an email that gives the sender a great deal of control over the content being created in Confluence. It overrides other settings found elsewhere in the email as well as the default settings found in the admin area. Command tags are stripped from the content before that content is created in Confluence.
A command tag can be in the email subject or in the body of the email. In both cases, it is stripped out before the content is used to create content in Confluence.
For cases where a user wants to send an email to create content but only has a standard email server not supporting 'plus addressing' or a 'catchall account' it is still possible to control everything about how and where that emails is used to create content in Confluence.
The app searches for a "command tag" in the email subject and then in the body if not found in the subject.
A command tag looks like <M2P:space=TS:title=My New Page:contentType=page/>
- Each parameter in the command tag is a key/value pair separated with an equals sign (key=value)
- Separate multiple parameters with a colon (key1=value1:key2=value2)
- Correct format is: <M2P:key1=value1:key2=value2/>
- The tag should be on one line of text
Supported parameters:
- space - Space key. if this is not included the default space specified on the admin screen will be used
- title - overrides the title found in the "to:" or subject (we do not currently support colon (:) or equals (=) in titles.
- used only when creating content. Never used to find existing content.
- parent - format: page title or page ID. Page ID is preferred, future versions may require page ID. If this is a blog then this option is ignored.
- This is the page that will be operated on. You can also specify an action to perform, using the 'action' parameter.
- contentType - blog or page, defaults to page
- labels - comma-delimited list of labels to add to the page
- <M2P:labels=label1,label2,label3>
- action - an action to be performed on the existing page the is specified in the 'parent' parameter. It is also possible to use the 'action' to specify an action to perform on an existing page that is found, not by the 'parent' parameter, but by plus addressing or a page title in the email subject. The following values are supported:
- comment - adds a comment to the existing page/blog using the content of the email
- attachments - adds all email attachments to the existing page/blog
- append - appends content to the existing page/blog using the content of the email
- prepend - prepends content to the existing page/blog using the content of the email
- replace - replaces the content of the existing page/blog using the content of the email
- child - adds a child page to the existing page (only available for pages, not blogs)
Examples:
Create a page named "My New Page" in the space with key "TS":
<M2P:space=TS=:title=My New Page:labels=support,history/>
Create a blog post named "My New Blog" in the space with key "TS":
<M2P:space=TS:title=My New Blog:contentType=blog>
Add a comment to a page with ID=12779714
<M2P:parent=12779714:action=comment/>
Precedence - How the system decides what instructions to use:
page/blog title:
command tag, email address (plus addressing), email subject
content type (page or blog):
command tag, matching content type for content with title found in email address (plus addressing) or in the subject, admin setting for "Default Content Creation Choice"
Email Server Options
The Send Email to Page app can be used to create a page anywhere in your Confluence server even with no special email server (IMAP/POP) abilities or settings.
To get the most out of this app you'll want the app to be able to parse the "to:" address to give each page its own unique address.
There are at least two ways to do this.
Method 1: Plus Addressing (also called email aliasing):
There are several email servers and email services which support "plus addressing". The most well known of these is Gmail.
This allows an address such as Steve.Jobs@gmail.com to also receive any email to Steve.Jobs+Some+More+Text@gmail.com where 'Some+More+Text' can be any alphanumeric chars and the + signs represent spaces essentially.
The app will get messages from that account and then parse the "to:" address to see if it can derive a space key and page name to deliver the content/attachments to.
Many companies running Confluence will, of course, need to run behind a firewall and cannot use Gmail or even a Gmail account provided by a Google Apps account. However, there are some email servers which appear to support 'plus addressing'
- Dovecot - open source, very well documented, runs everywhere on everything, however, requires a sysadmin to install/configure
- Smarter Tools Mail Server - Windows only, free for up to 10 accounts (this app only needs 1), I haven't tried it or tested with it as of yet but plan to shortly #.#
Method 2: Setting up a Catch-all account
Another potentially simple way to set this all up is to create what's called a 'catchall' account. In this case, you are able to 'catch' all the email sent to a certain domain and forward it to another account.
So in the scenario, you configure an email domain such as mydomain1.com so that email sent to *@mydomain1.com (where * is a wild card for any address) is then forwarded to an account such as SendEmailToPagePlugin@mydomain2.com
Thus a user could send a note to 'plugin+myspacekey+My+New+Page@mydomain1.com', then the email would be forwarded to the account 'SendEmailToPagePlugin@mydomain2.com'. The app would go check this account and be able to parse the To: address thus knowing to create a new page called 'My New Page' in the space having the space key myspacekey.
Here are simple instructions from 1and1 IONOS for setting up forwarding using a catch-all email address:
- You may not be using 1and1 for your email but this shows the concept of catch-all forwarding
- Advantages of a Catch-all Email Address
- Setting Up Forwarding for Email Addresses
Email address aliasing and how Gmail makes unique page addressing possible
For this feature to work most effectively the IMAP or POP server being used must support 'email aliasing'.
This feature can be called:
- plus email addressing
- address aliasing
(same feature - just different names).
In a nutshell :
An email account 'your.username' can receive messages sent to your.username+any.alias@somedomain.com. For a GMail example, messages sent to jane.doe+notes@somedomain.com are delivered to jane.doe@gmail.com.
The feature is very clearly and succinctly explained on these two pages:
- http://mail.google.com/support/bin/answer.py?hl=en&answer=12096
- http://www.smartertools.com/help/smartermail/v3/Topics/User/Mail/PlusAddressing.aspx
http://www.smartertools.com/help/smartermail/v3/Topics/User/Mail/PlusAddressing.aspx
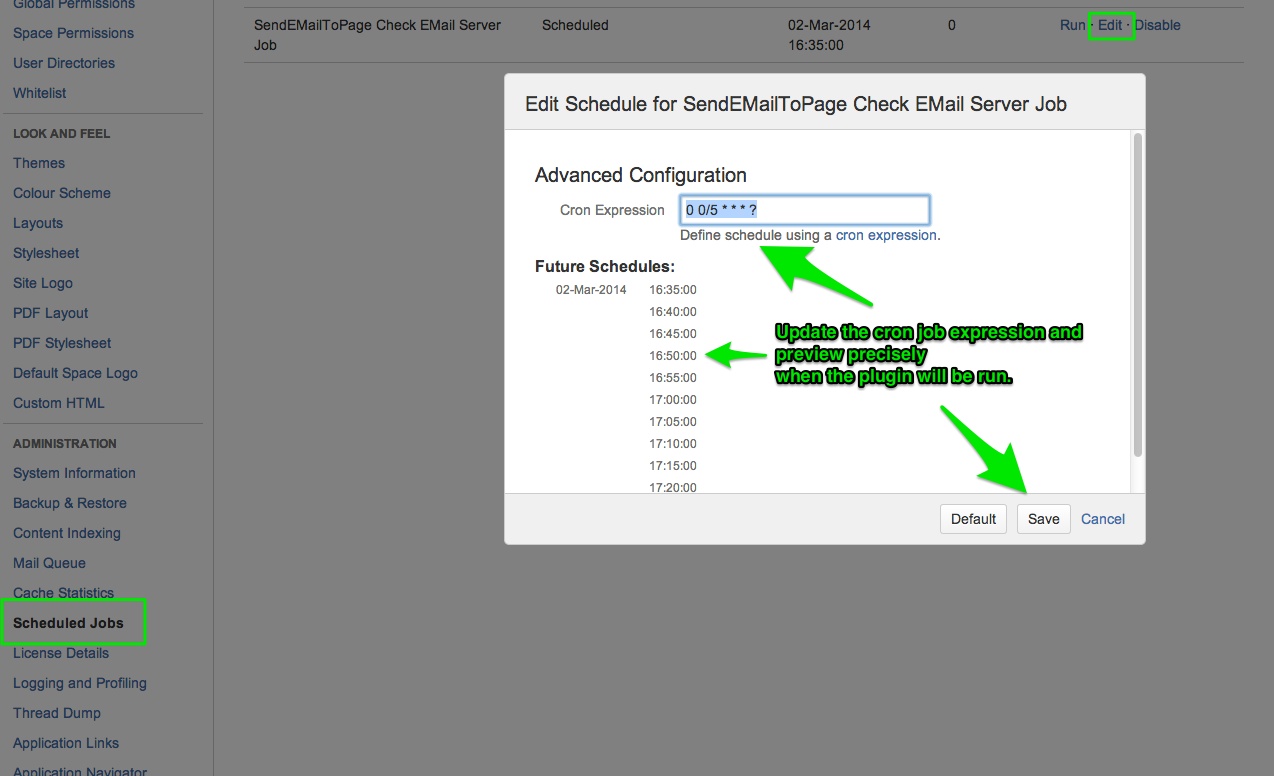
Configure how often the app will check email
You can configure how often the app checks for email. Go to Admin -> Scheduled Jobs and find SendEMailToPage Check EMail Server Job
The default setting is to run the job once every 5 minutes.
Notice that, because it is a scheduled job, there is a "Run" link that you can use to force the app to immediately check for emails instead of waiting for the next scheduled check. This is useful when experimenting with the app.

FAQs
Why aren't my pages/comments/blogs showing up?
- The app must be properly configured.
- General Configuration → Send Email To Page Admin → Email Server Configuration
- There is a "Download Log Files" button you can use to get the logs for troubleshooting.
- The app respects the permission setting of your Confluence server when a user sending an email 'matches' the email address of a user in the system. If that user does not have permission to create content ( a page/blog/comment) then the creation of the content from that email will fail.
What can I do to debug?
- I'd recommend trying the following steps to get a bit more info:
- Temporarily disable the SendEMailToPage "job" found at Administration → Scheduled Jobs. This is so the app stops checking automatically and you can control when it checks....otherwise test emails are removed without you getting the info.
- Send a test email
- Check the email from the Send email To Page Admin screen (found via a link on the left of high-level Administration page)
- Look at the results published on the screen
- And of course, looking at the log files is helpful, there is a button to get them directly from this Send EMail To Page Admin screen!
Why is my configuration not connecting to my mail server?
Our first recommendation is to verify the settings against a Gmail account or a GoogleApps account because if your server can access Google this should work.
Beyond that the reasons we have seen for inability to connect to the email server are typically:
- there is a typo in the configuration - server, port, username, password
- the port from the server running Confluence to the mail server is not open
- sometimes everything is correct but the browser is caching an error message
- a strange non-standard mail server configuration amongst folders can cause an issue
- if content is not being created (a slightly different issue) then often the permissions of the user who is sending the email (matched by incoming email address and the user's email in their Confluence profile) are such that they cannot add the content (page, blog, attachment, comment, etc)
What are example settings that are used to test
Hostname: imap.googlemail.com
Port: 993
Protocol: imaps
username: <your-gmail-usern
password: <your-password-here>
Why is the Confluence server having trouble reaching the email server?
The Confluence server attempts to connect to the email server directly to retrieve emails. In some cases, system administrators have not opened the necessary ports for Confluence to access the email server. Please make sure the correct ports are open.
Release Notes
Knowledge Base & Support Info
Knowledge Base Articles
Filter by label
There are no items with the selected labels at this time.
General Articles