| Panel | ||||||
|---|---|---|---|---|---|---|
| ||||||
This page is about Canned Responses Pro Templates for Jira Cloud. Using Server or Data Center? Click here. |
On this page, you’ll learn how to create a template in Canned Responses.
How to Access the Template Creation Screen
It’s possible to create a template directly in the issue or on the configuration (Templates) page:
| Anchor | ||||
|---|---|---|---|---|
|
Canned Responses – To access this screen, click Apps > Canned Responses > Templates > Create template.

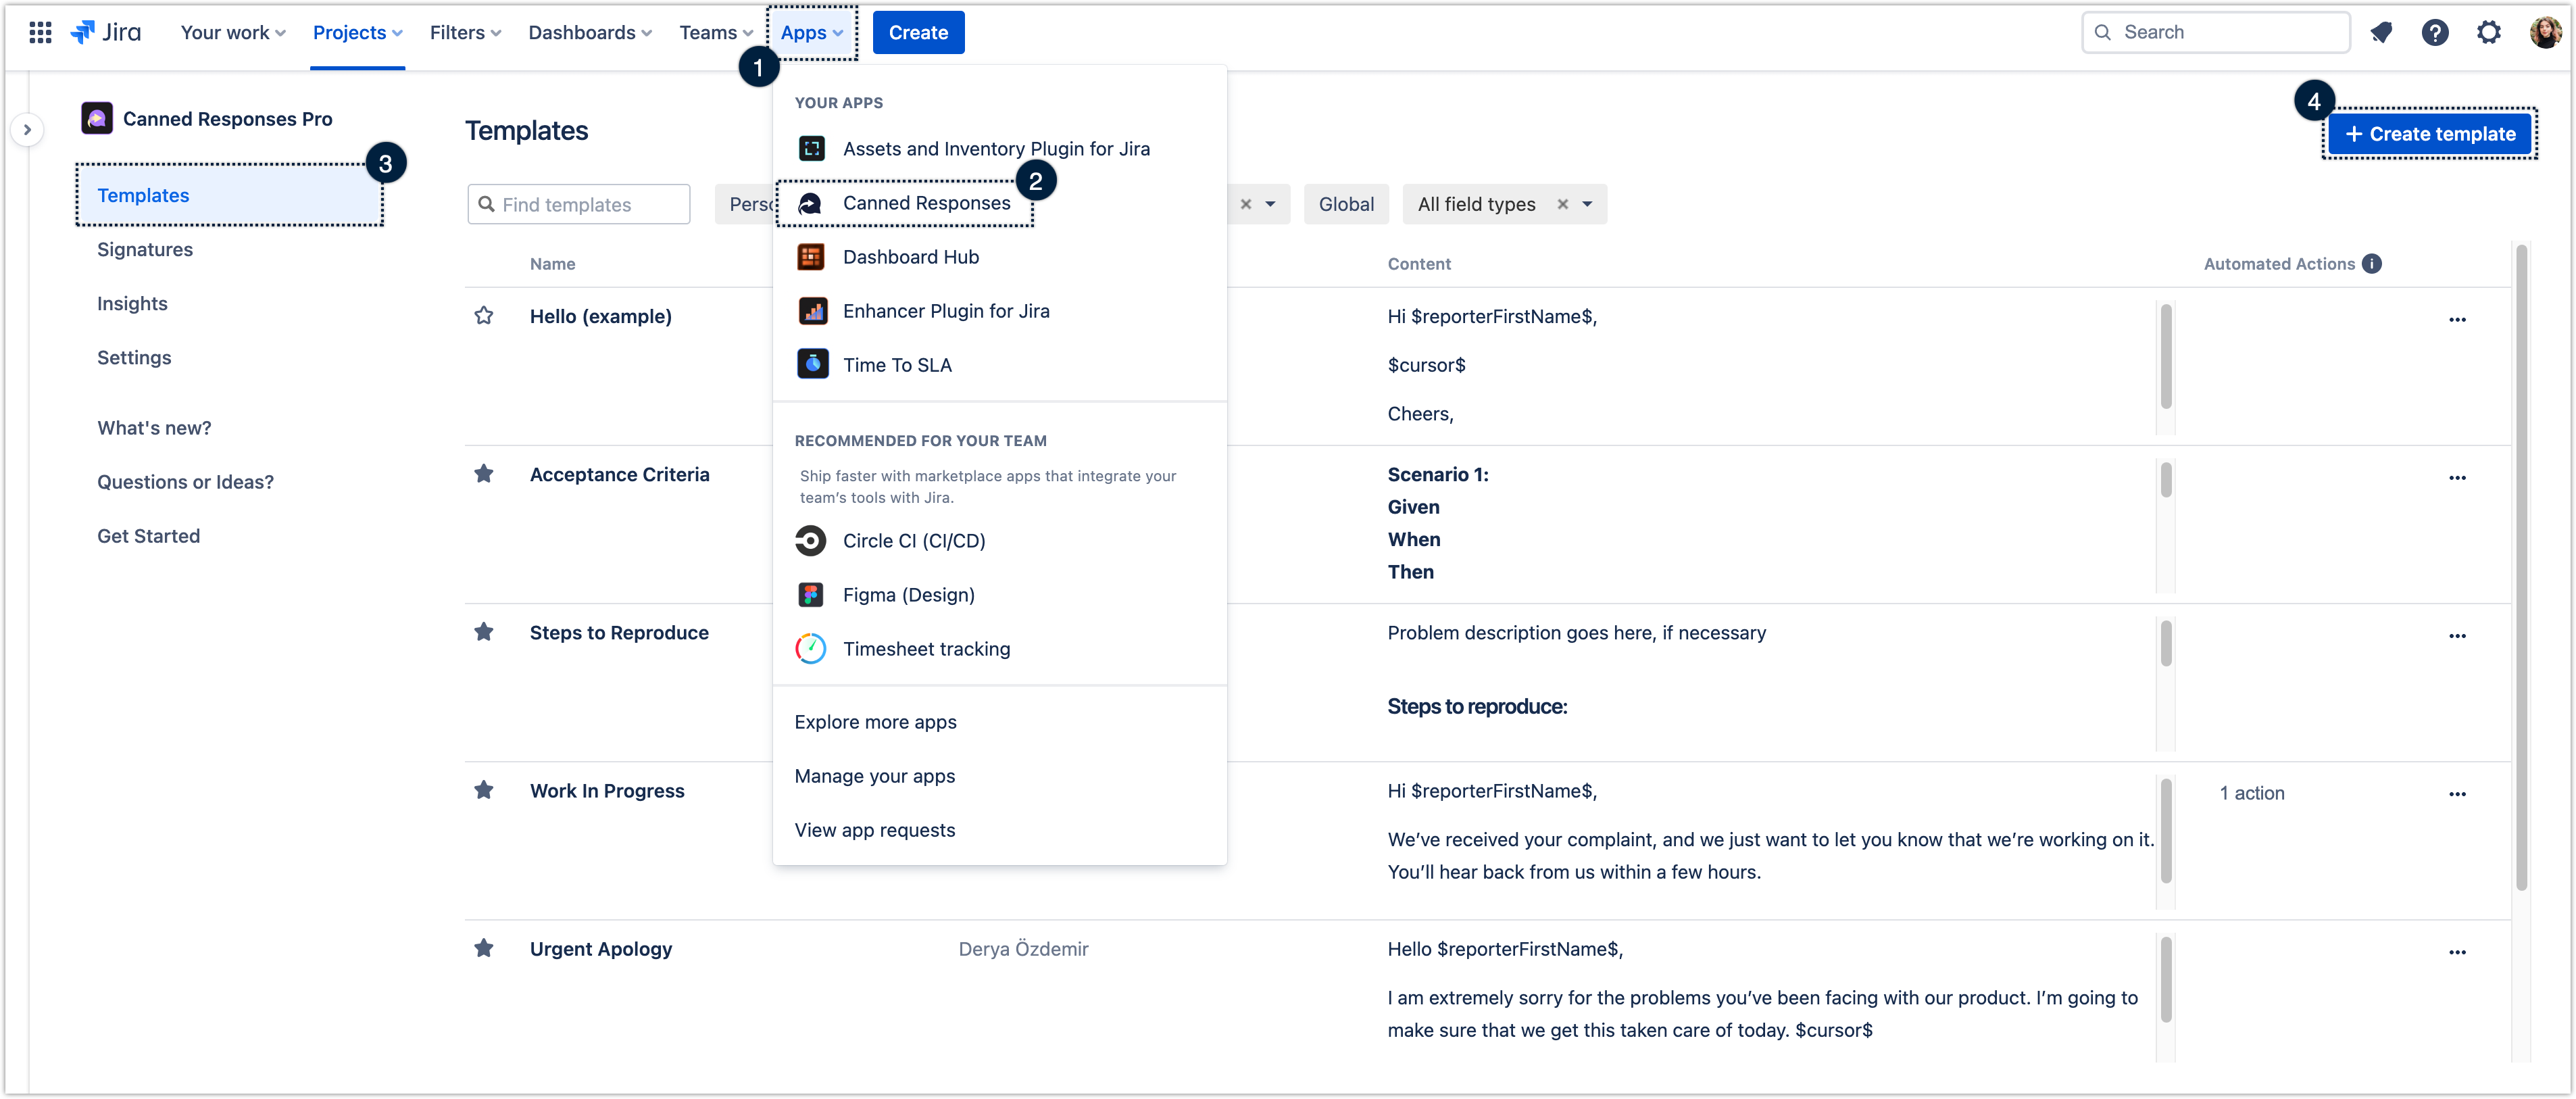
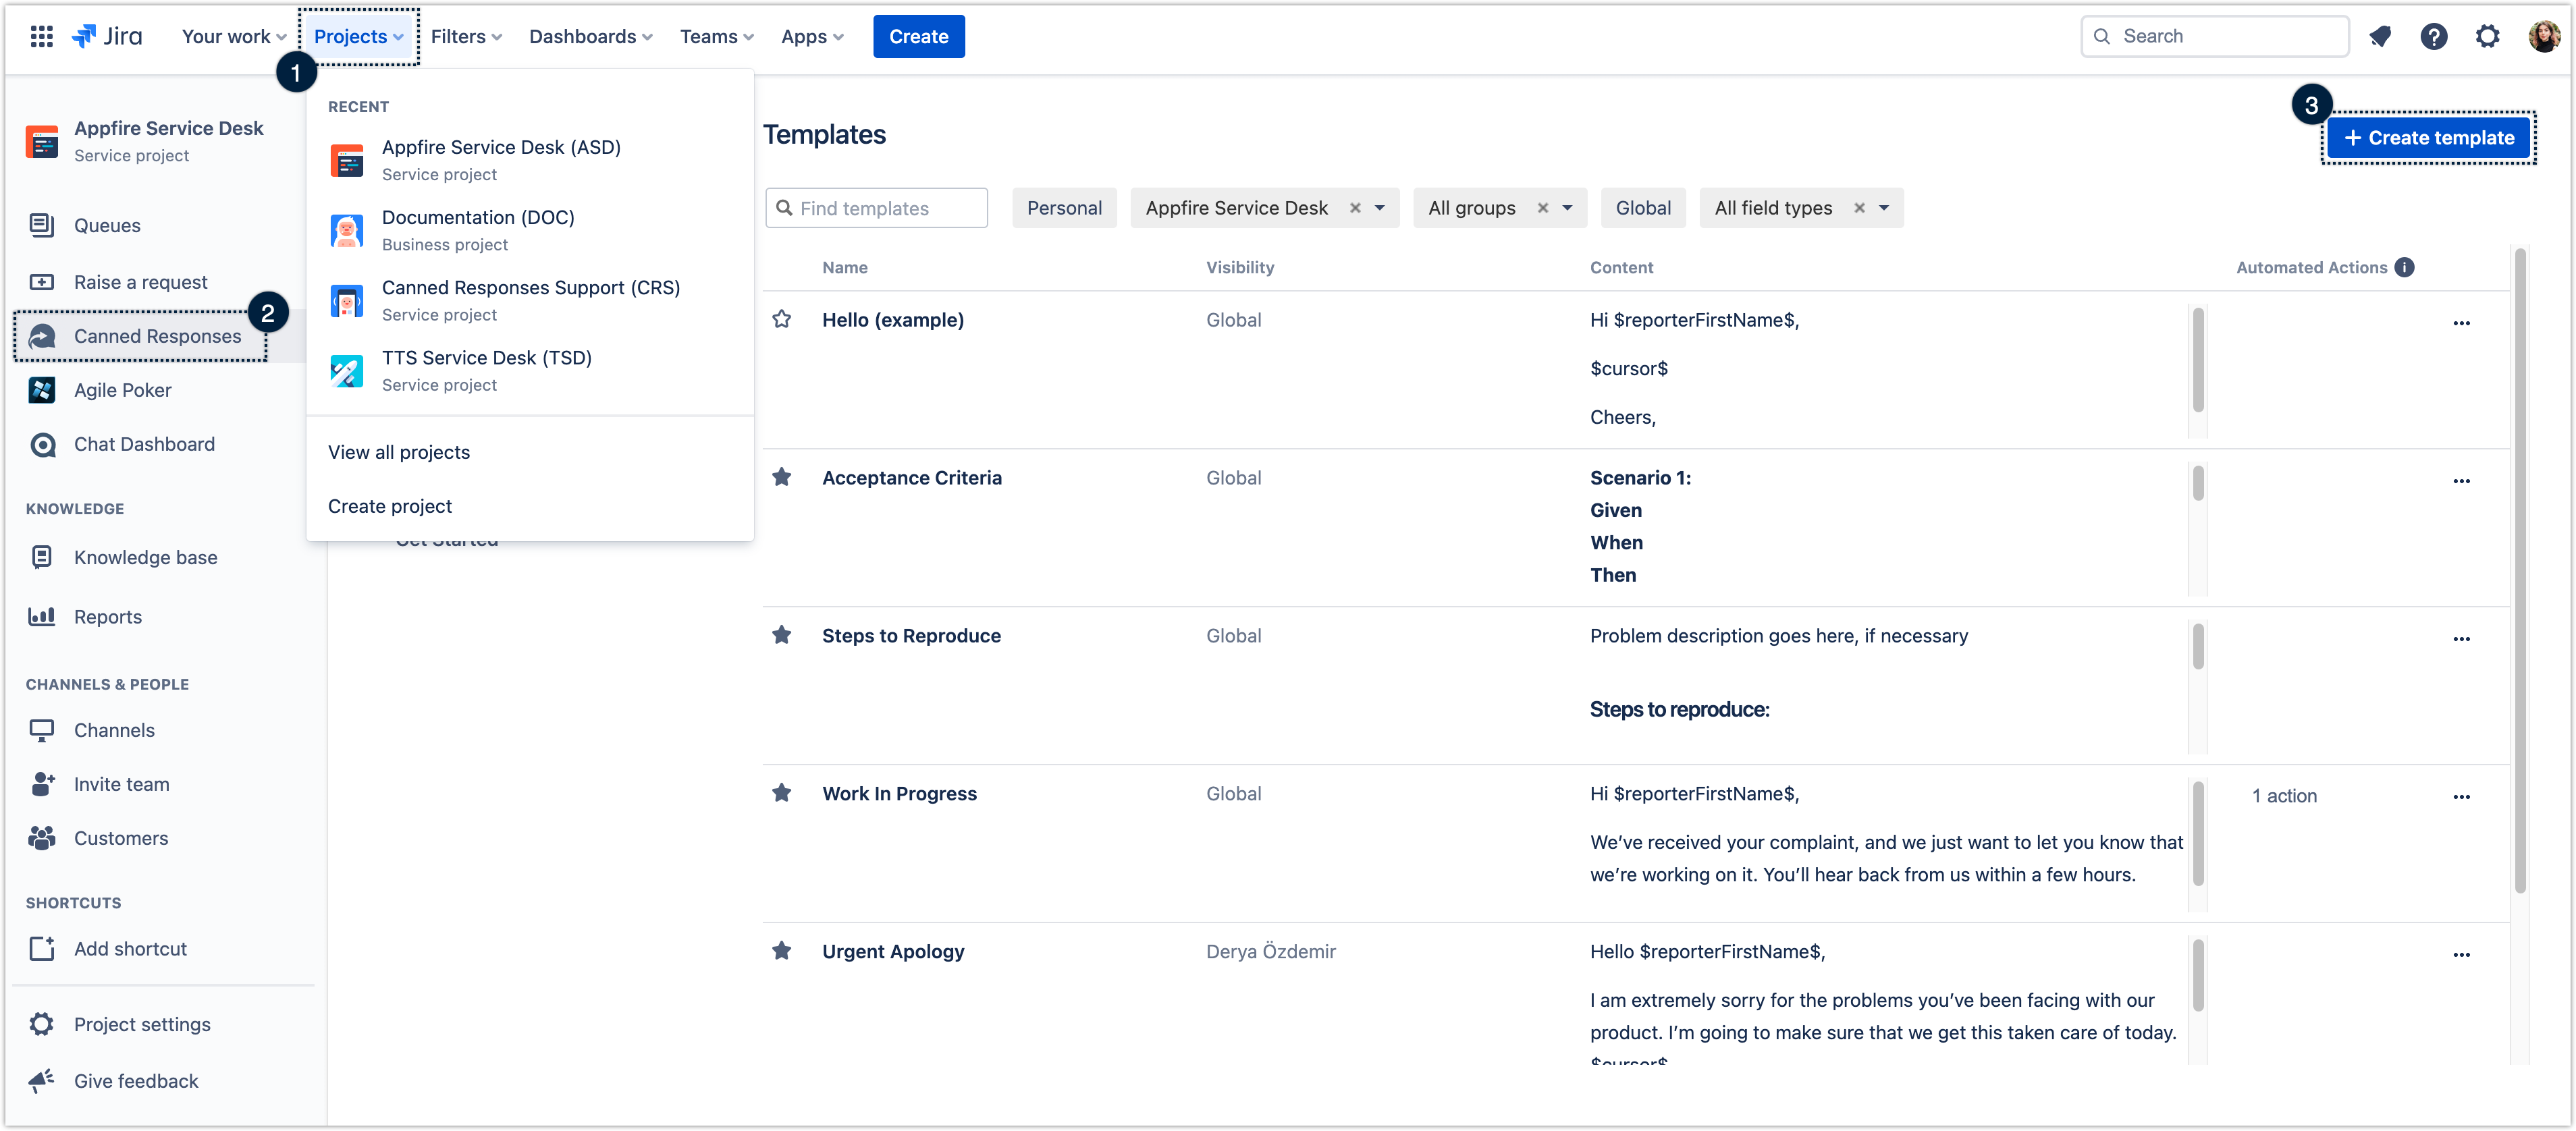
Alternatively, you can access the Templates screen by opening your project and, through its sidebar menu, clicking Canned Responses. Then, on the Templates screen, click Create template.

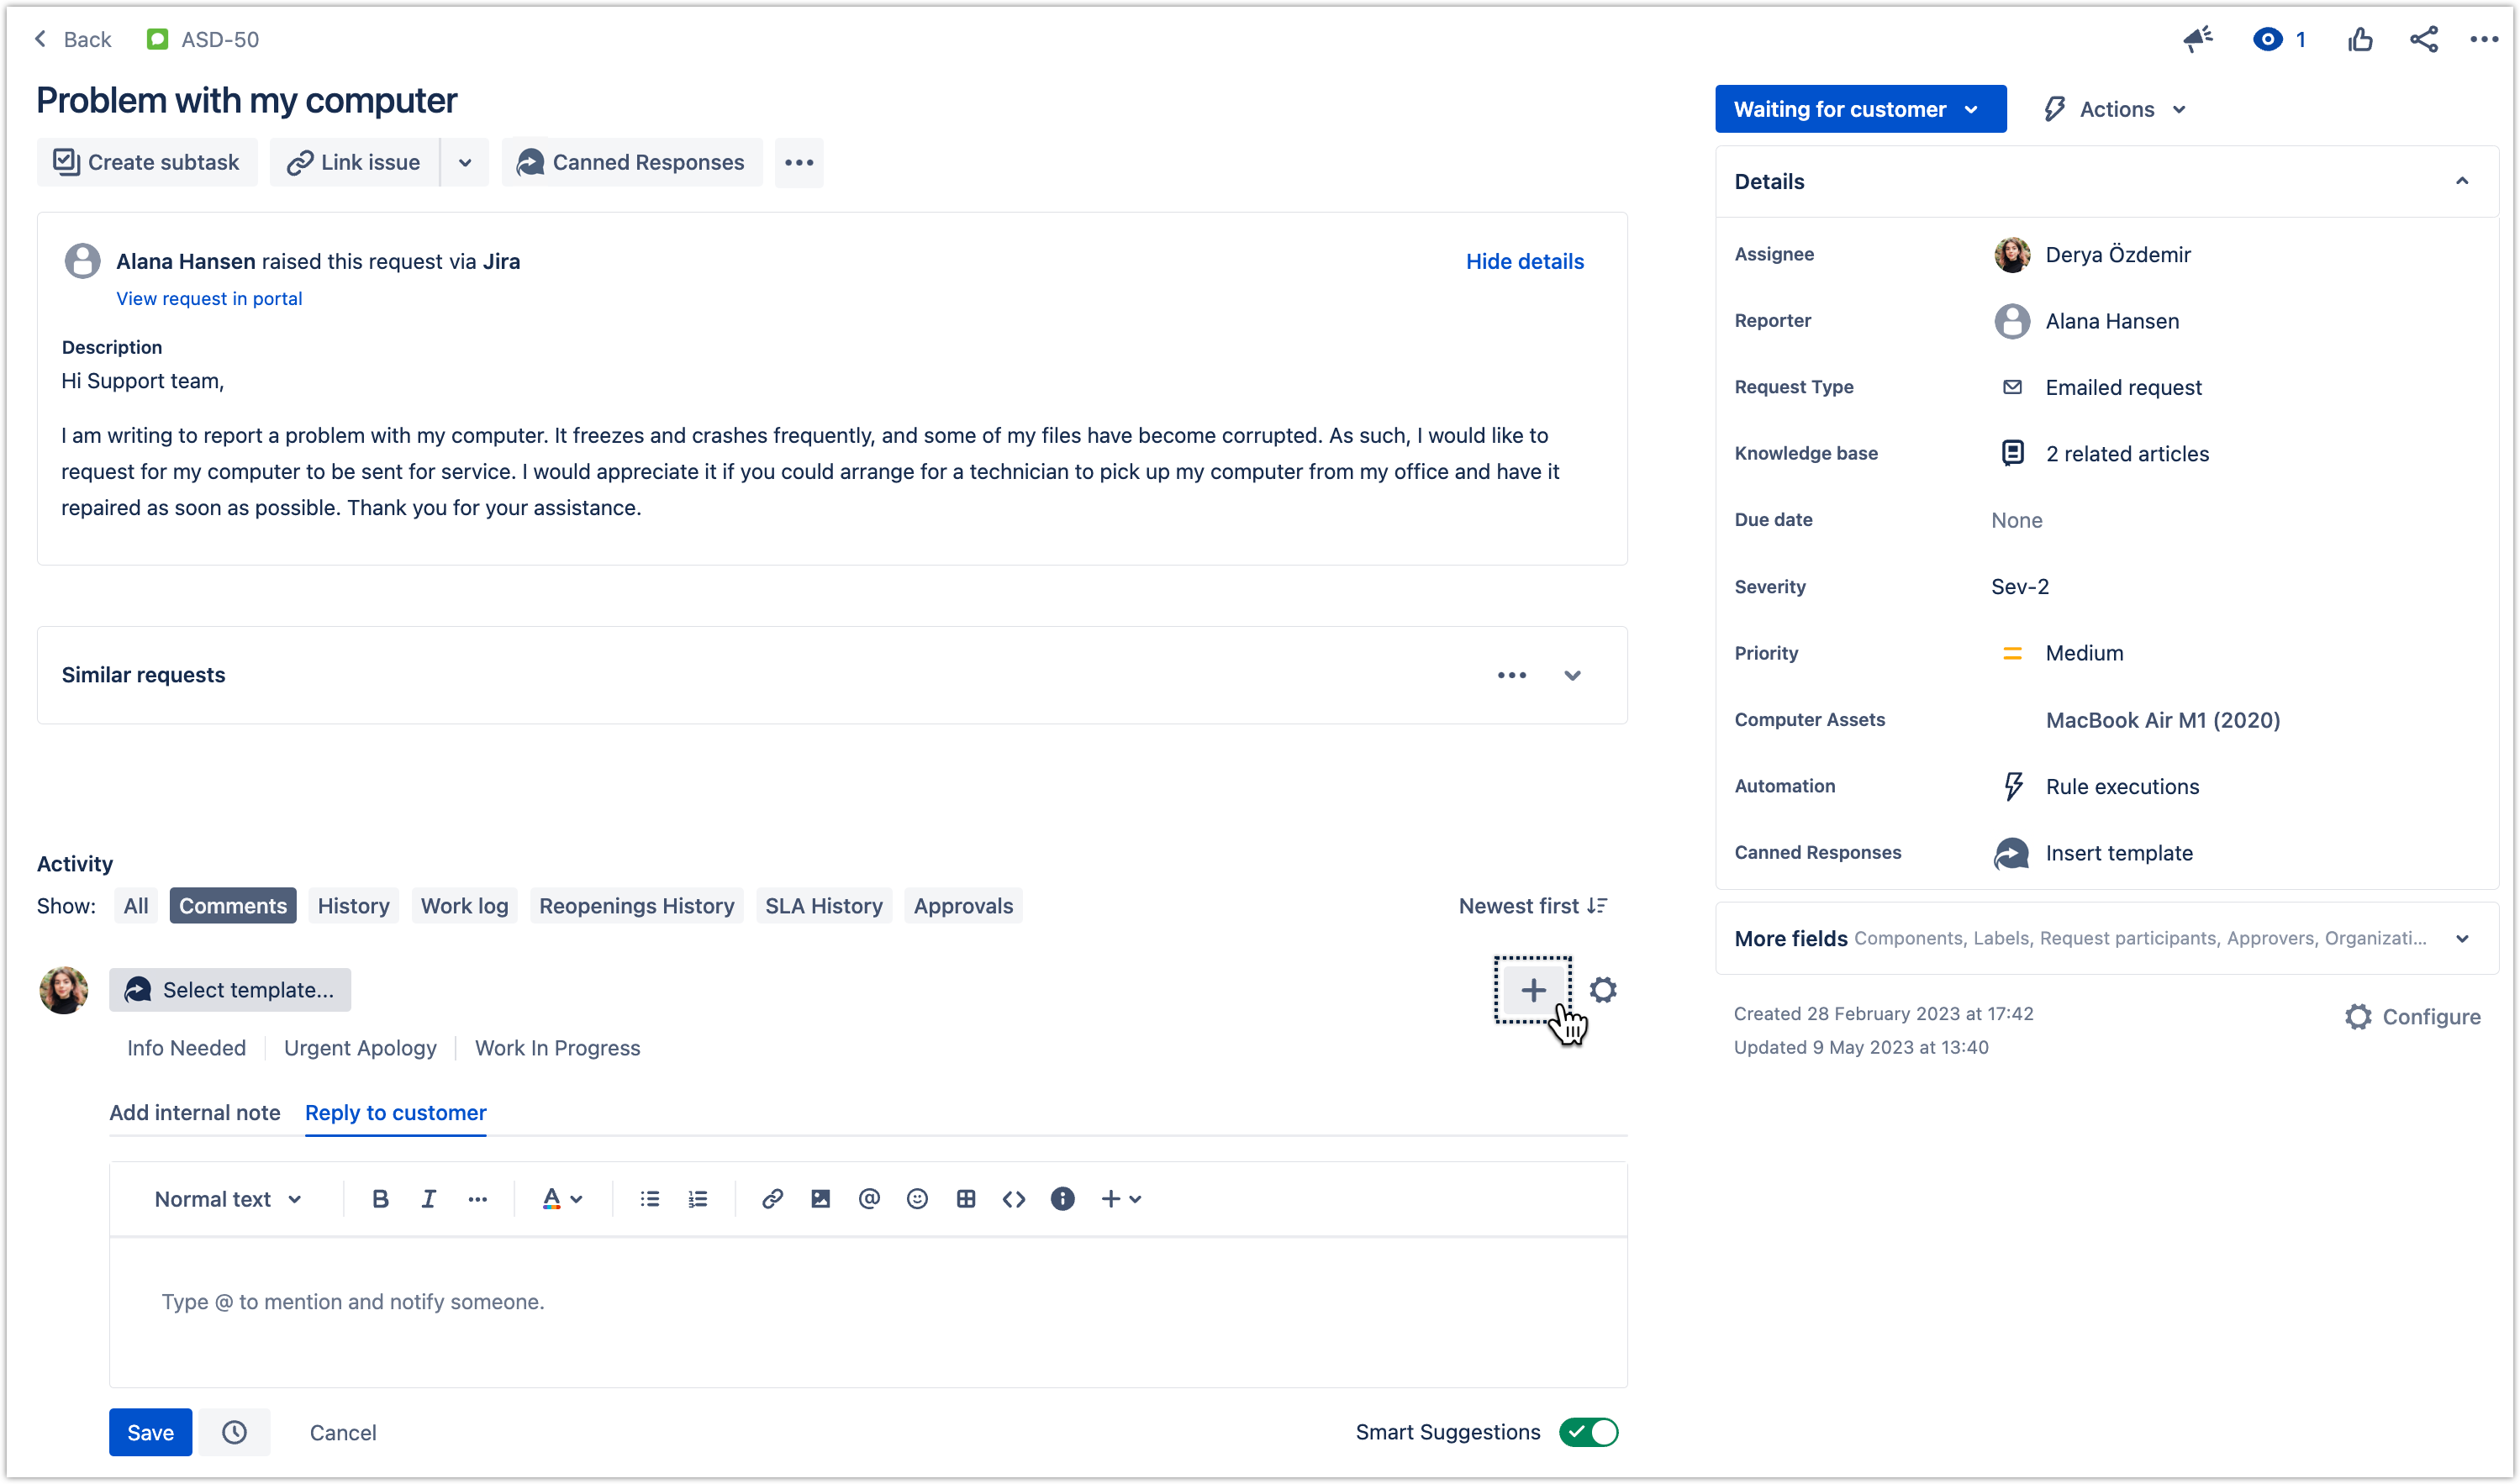
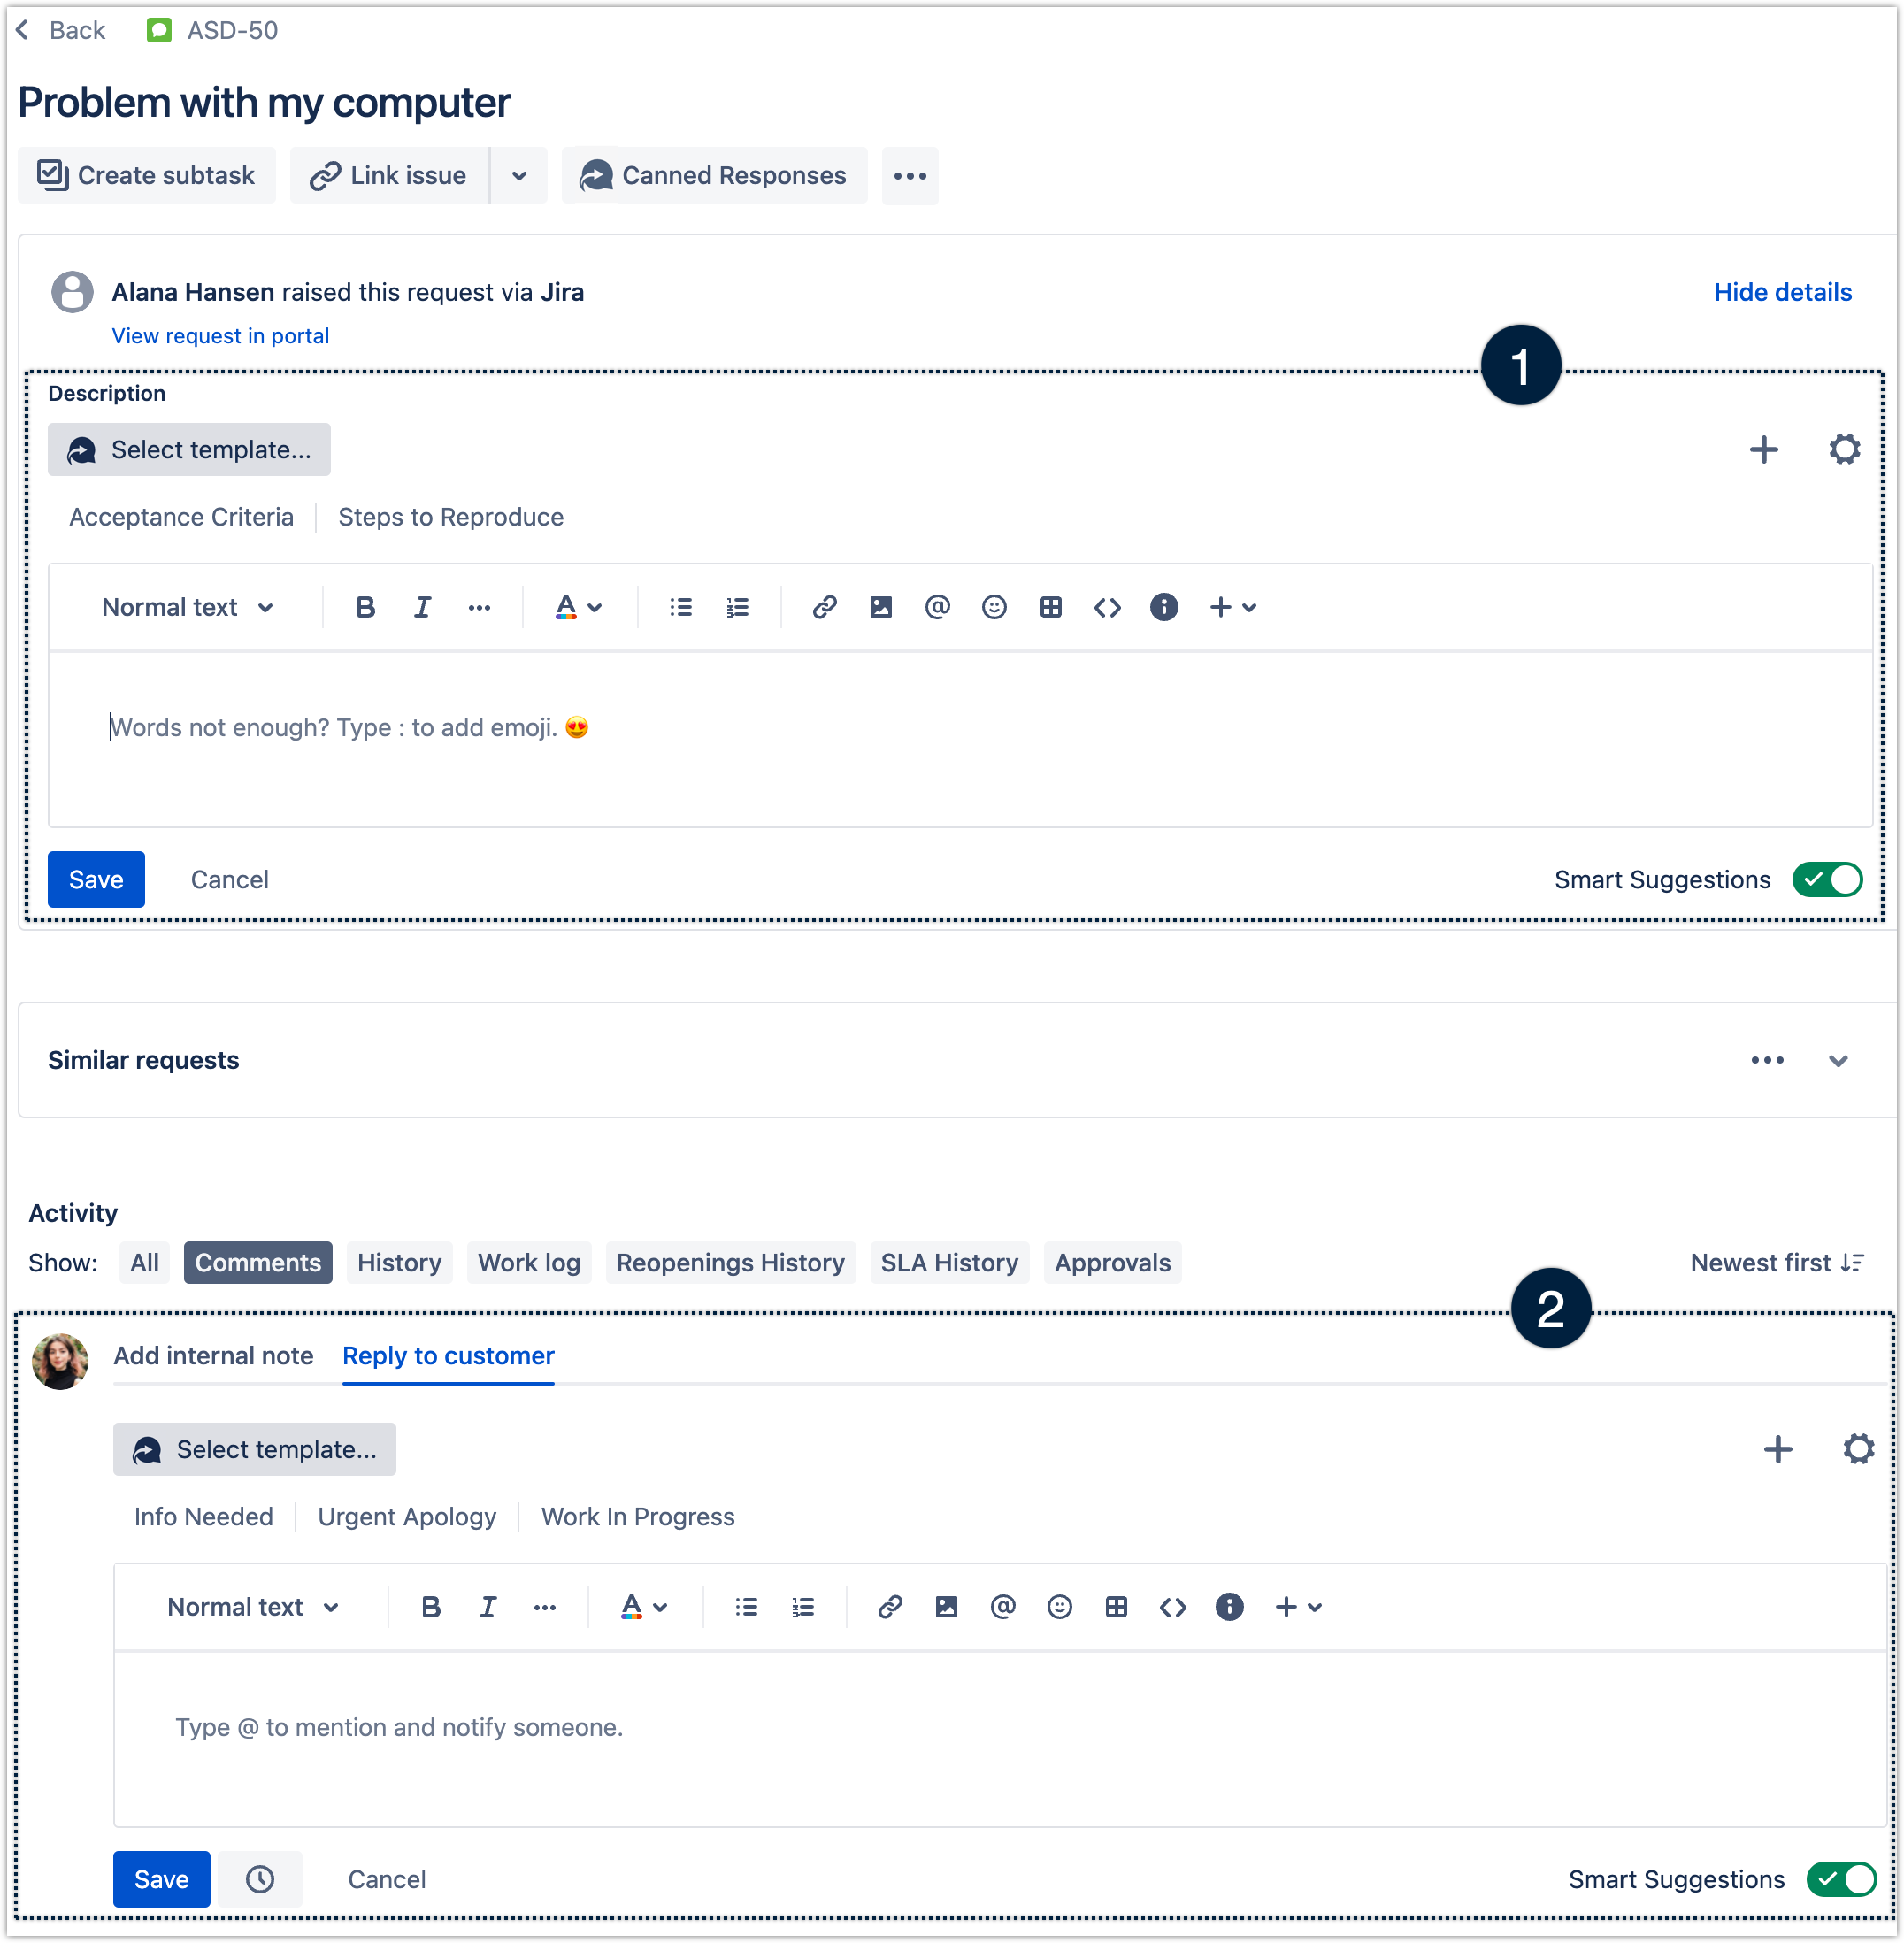
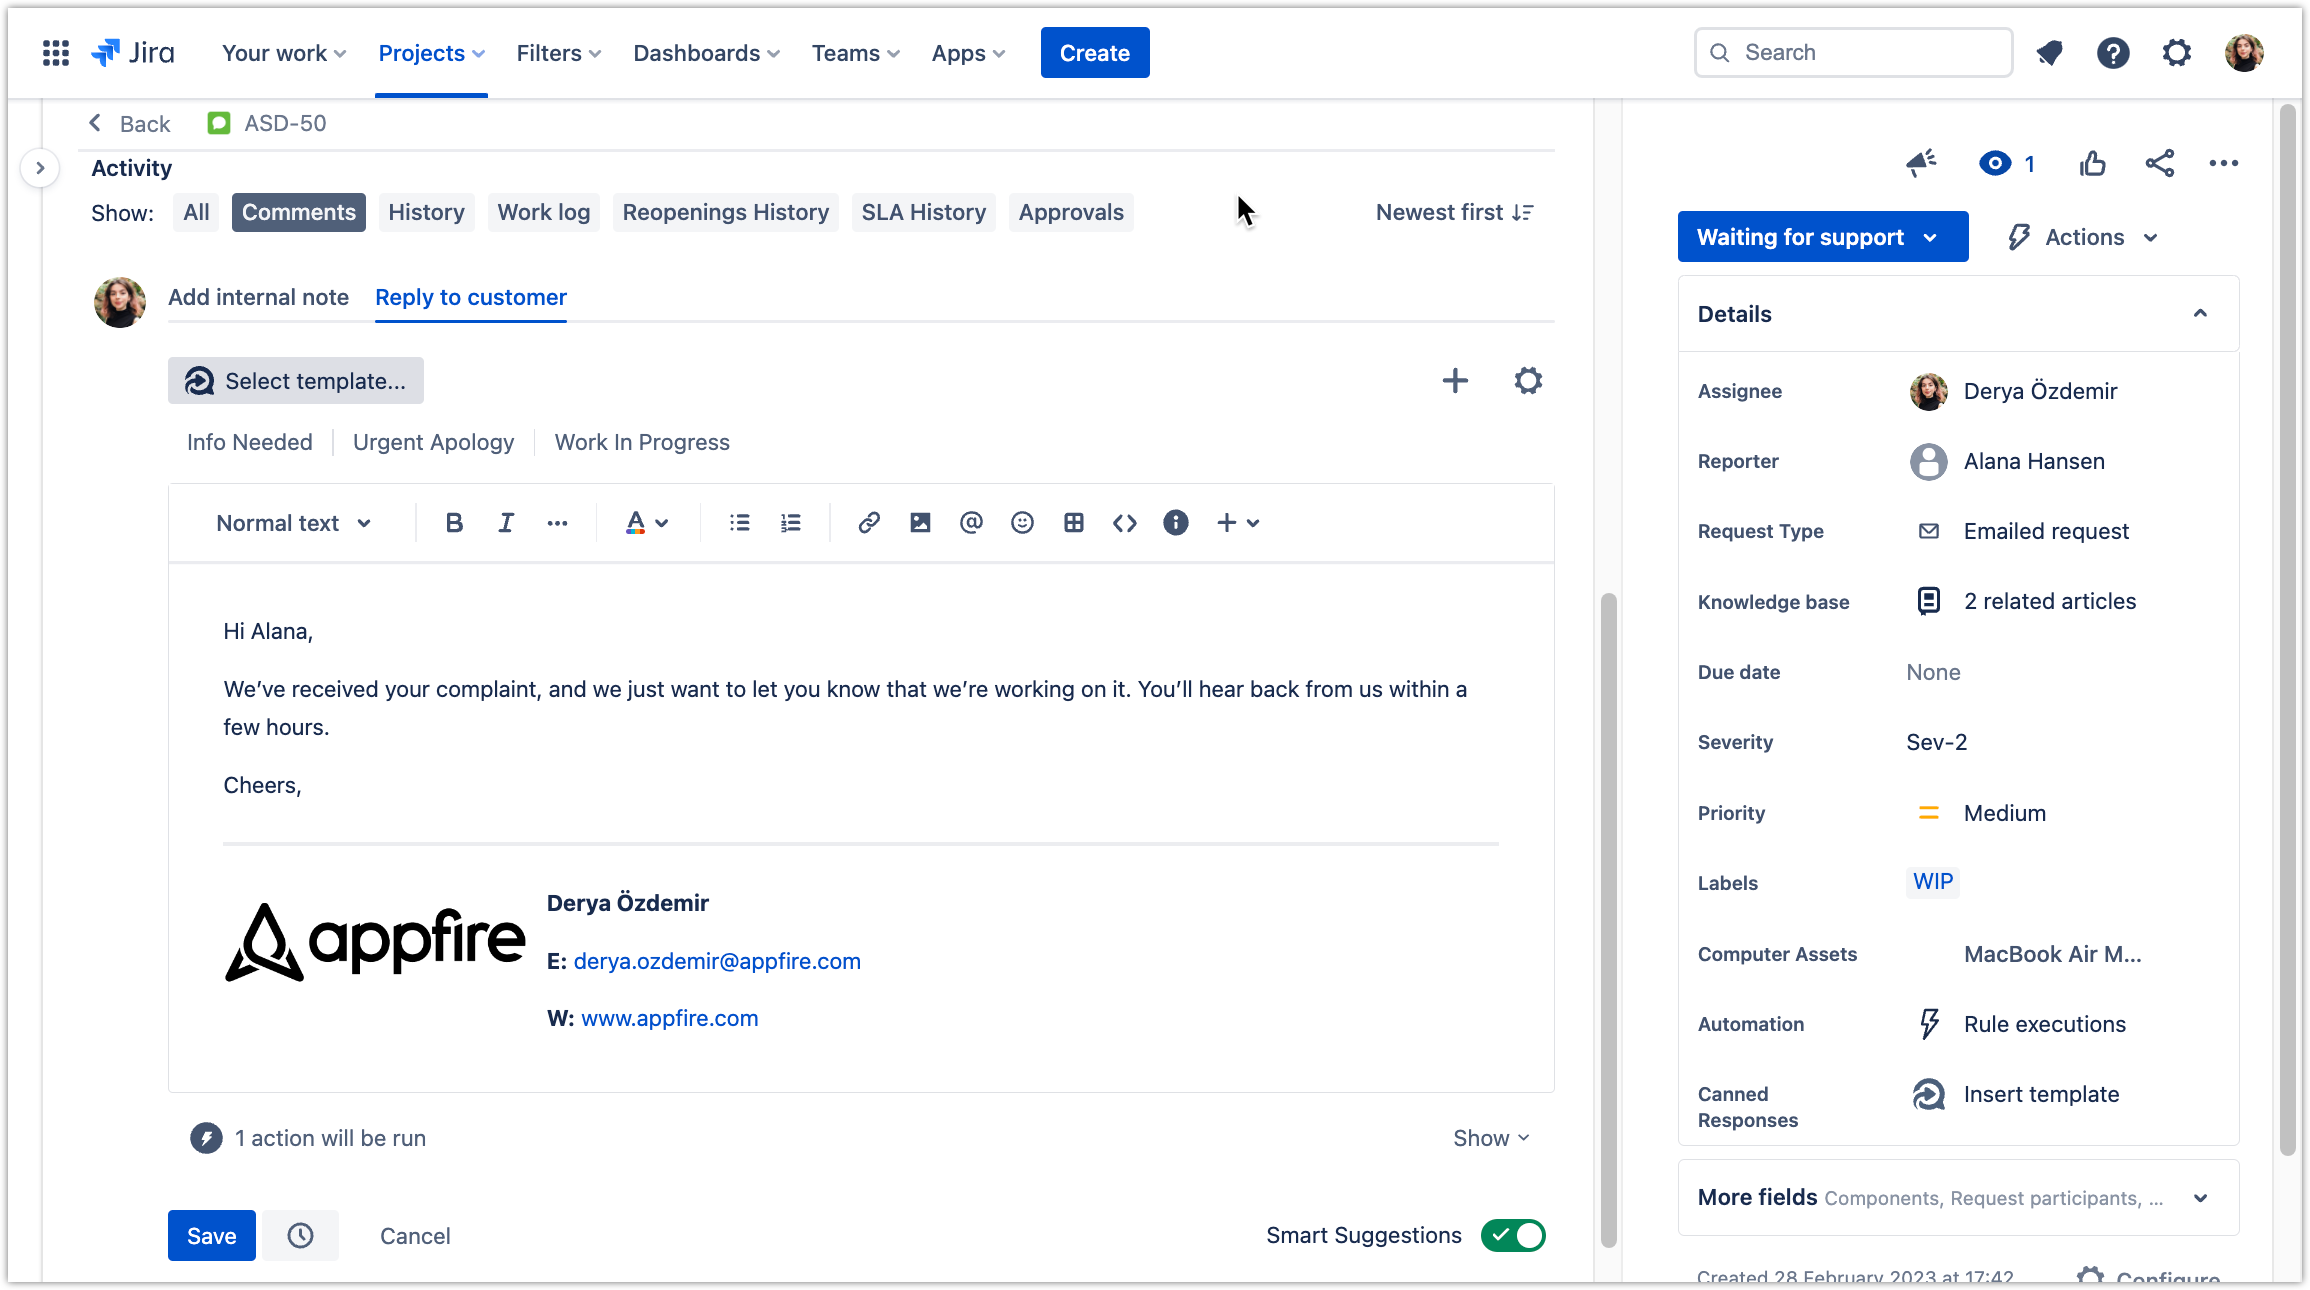
The Canned Responses panel – This panel will appear in your issue view after installation. If you have the browser extension installed, it’ll appear in the native Jira comment box and description field; if not, it’ll appear above the Activity panel.
The CR panel features the Create buttonfor creating a new template, a dropdown for selecting and inserting templates, an editor box, and more.
Click Create tocreate a new template.
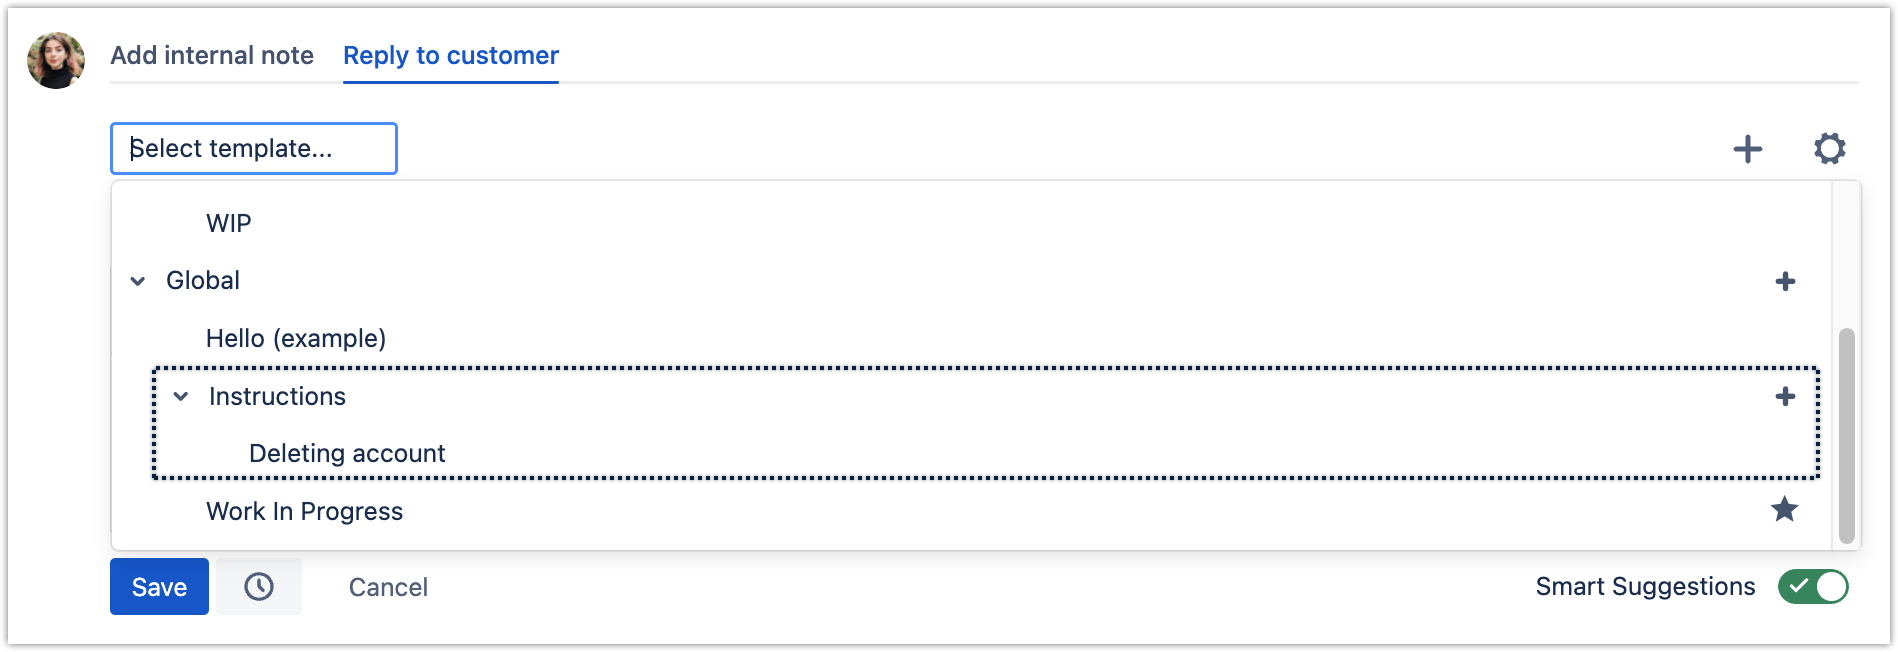
Alternatively, you can create a new template through the Insert template dropdown. Here you’ll see all available templates. Personal ones are created by the user, while Global templates are available to all users in the Jira instance. To create a new template, click the ➕ button next to the desired template type.
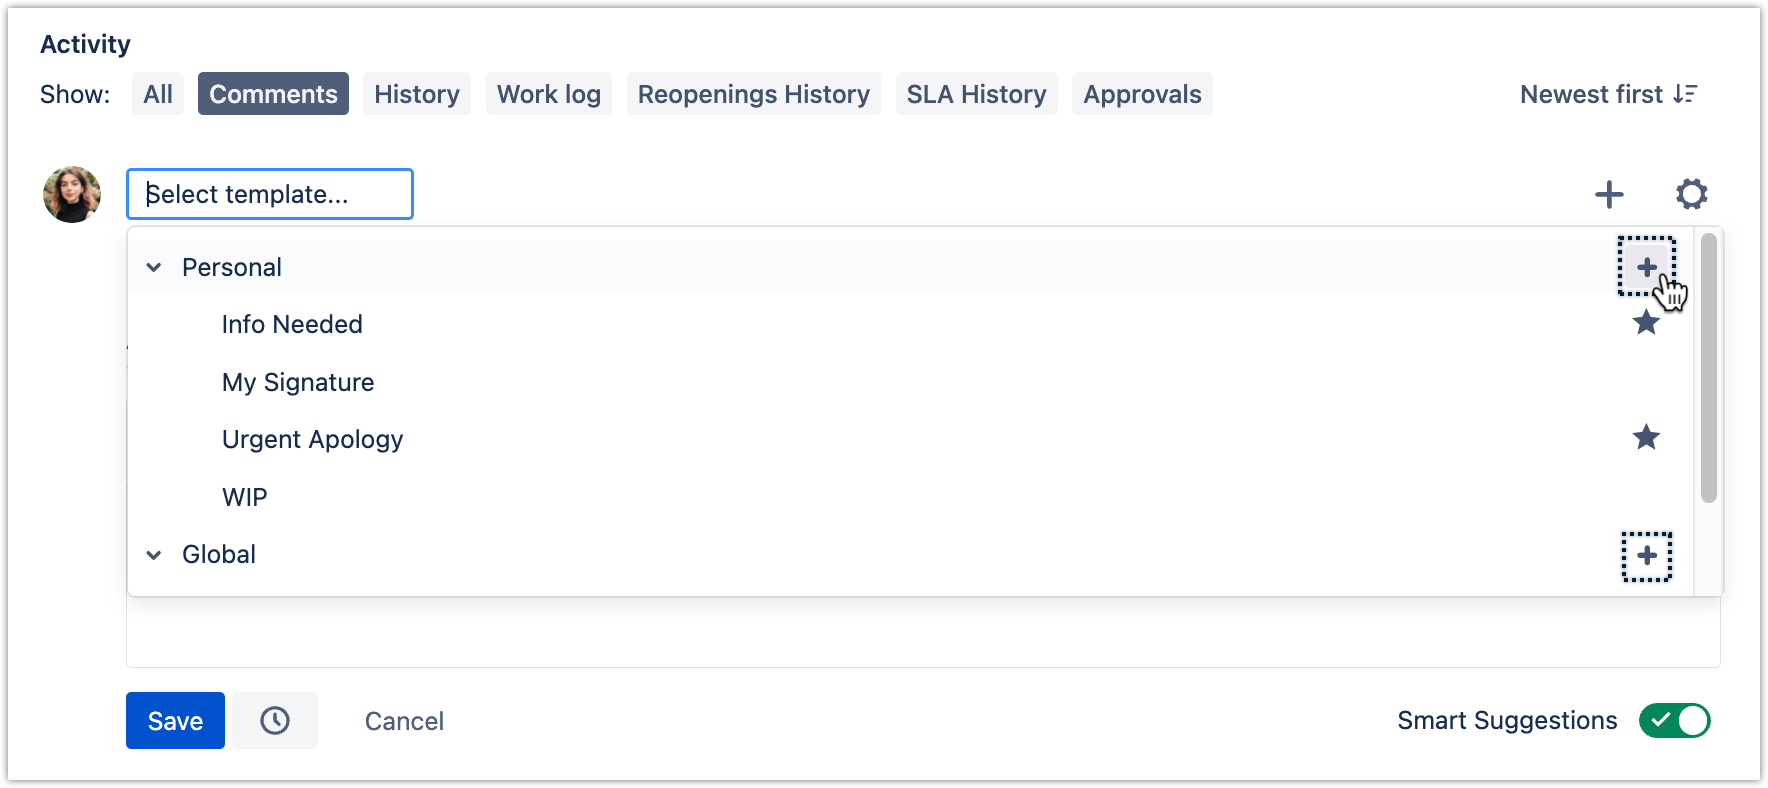
When you create new folders, the ➕ button will be available there as well.
| Anchor | ||||
|---|---|---|---|---|
|
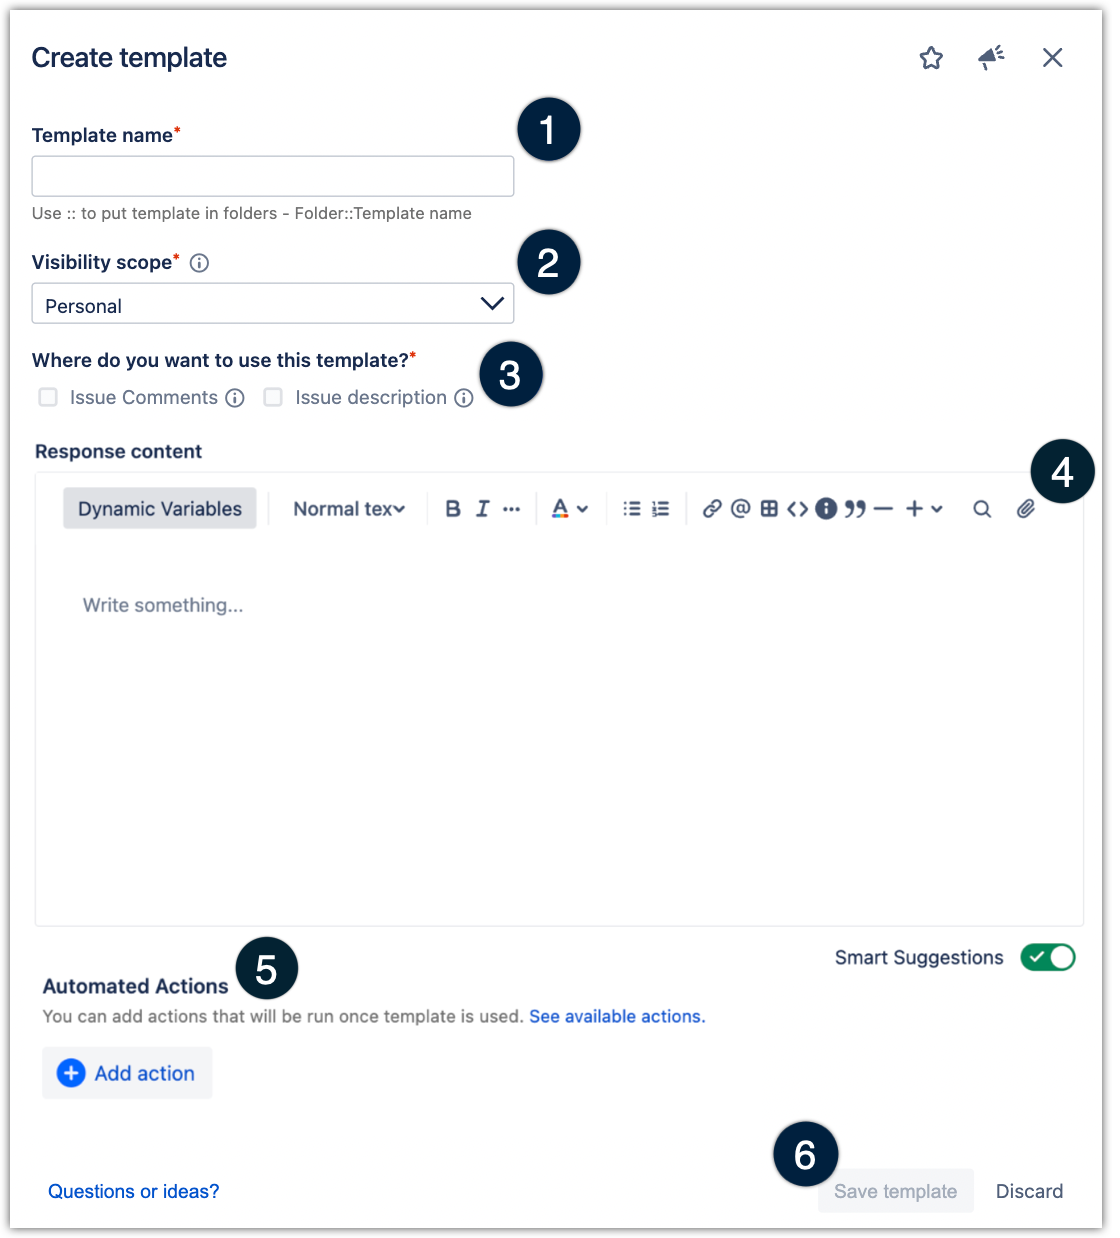
Now, let’s create a new template. After opening the Create Template screen by using one of the methods described above, follow the steps below and learn about each crucial component:
| Anchor | ||||
|---|---|---|---|---|
|
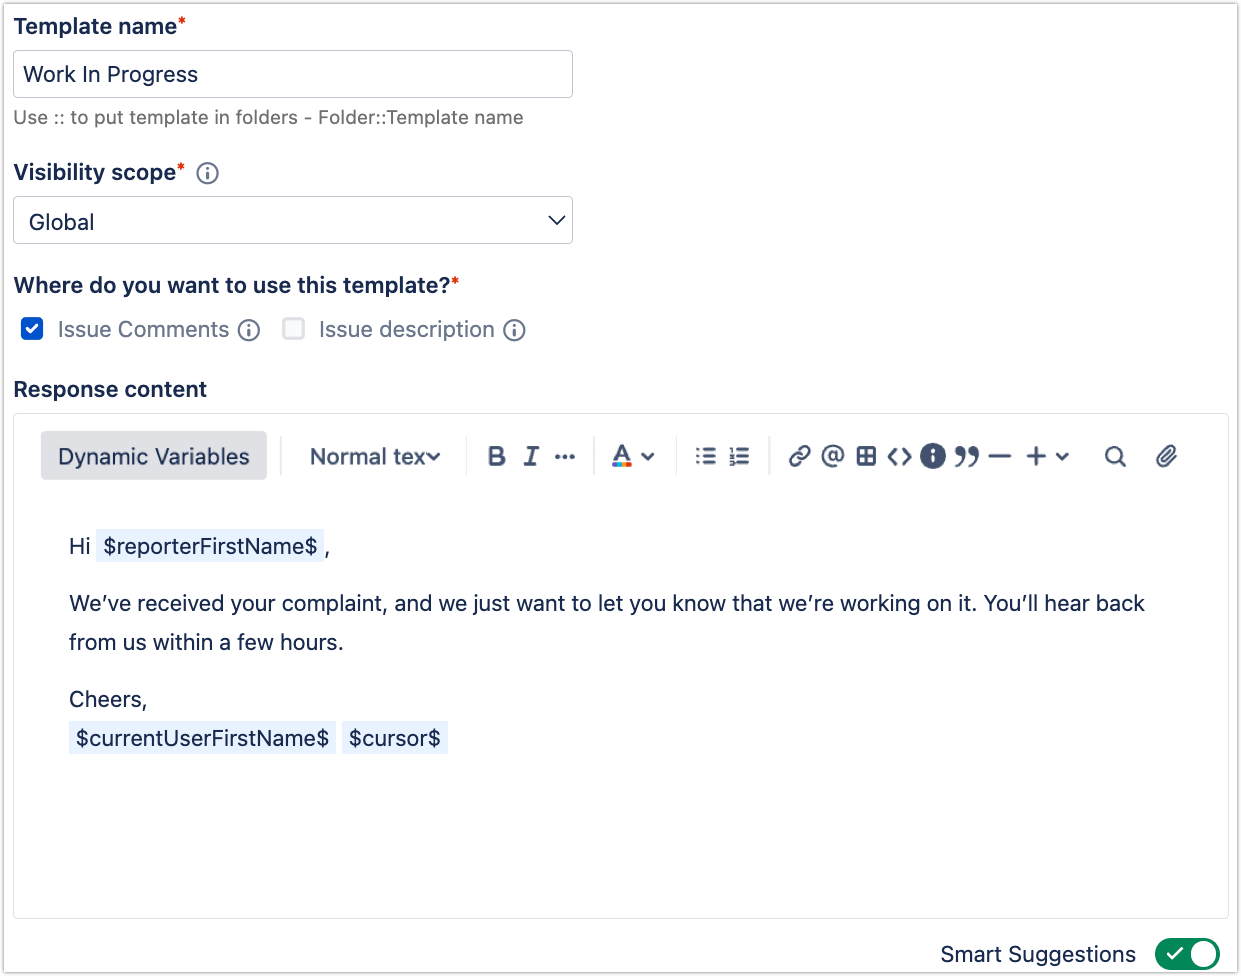
Enter a name for your template.
You can group templates into a hierarchical structure using a double colon in the template name. By adding double colons, you can separate the folder from the templates that belong to it. This is especially great for organizing templates if you have a large number of them. For example, to put the "Deleting account" template in the "Instructions" folder, you can name the template Instructions::Deleting account and it'll be nested accordingly.
When browsing through the templates, users will see the folders (differentiated by the arrow next to their title) first and can access them to select a template. Check out the example below:
| Anchor | ||||
|---|---|---|---|---|
|
The visibility scope indicates who will see this template in Jira issues. Depending on your role, you can create templates in one of four types of scopes:
Personal – visible (in issues) to a specific user only. Managed by the user and administrators.
| Note |
|---|
IMPORTANT: Please note that the names and contents of the personal templates can be visible to other users on the Insights page and also in exported files! |
Projects - visible for issues from selected projects. Managed by respective project administrators and project leads.
If you select multiple projects, the template will be available for every user in all issues in each of those projects. Project leads or admins (as well as global admins) for all of the projects in the scope will have permission to edit and remove the template.
Group - visible to members of any chosen group.
Global - visible to everybody. Managed by Jira administrators.
For more information, check out the table below for the visibility scopes within Canned Responses:
Jira Admin | Project Admin / Lead | Group Member | Any User | |||||||||||||||||||||||||
|---|---|---|---|---|---|---|---|---|---|---|---|---|---|---|---|---|---|---|---|---|---|---|---|---|---|---|---|---|
Personal |
|
|
|
| ||||||||||||||||||||||||
Projects |
|
|
|
| ||||||||||||||||||||||||
Group |
|
|
|
| ||||||||||||||||||||||||
Global |
|
|
|
|
| Status | ||||
|---|---|---|---|---|
|
| Status | ||||
|---|---|---|---|---|
|
| Anchor | ||||
|---|---|---|---|---|
|
After defining the visibility scope, select where you want to use the template you’re creating. It is possible to create and use templates for:
Issue comments – The template will be available when adding an internal note, replying to a customer (in Jira Service Management), or leaving a comment (in Jira Software).
Issue description – The template will be available when adding a description in the issue view.

| Anchor | ||||
|---|---|---|---|---|
|
Create any template content using our powerful editor, which supports different text styles and formatting, links, mentions, and all other core features present in the native Jira editor, except for emojis. You can attach various file types, such as images, gifs, videos, PDFs, or any other files you prefer. For more information on attachments, refer to its documentation.
You can also use dynamic variables (formerly, macros), which are special keywords that will be dynamically replaced with proper data when the template is used, to generate contextual templates based on commented issue data. There are variables for all issue fields as well as custom fields.
How does the dynamic variables feature work? They are resolved while inserting the Canned Responses template into the comment or description field.
Template View
Issue View

Canned Responses supports all Jira custom fields. Some of the most commonly used dynamic variables are listed below, along with examples of generated content based on issue data. Special Dynamic Variables and Standard Fields can be utilized in Response content and on the Signatures page (Apps > Canned Responses > Signatures). In contrast, Signature Variables are only available on the Signatures page.
Dynamic Variable | Example result |
|---|---|
Special Dynamic Variables | |
| 24/Dec/20 (produces current date) |
| Joe |
| (sets the cursor position after a response is inserted) |
Standard Fields | |
| Joe Doe |
| Create a list of all variables so that users can easily see them all in one place before installing the plugin. |
| CT-198 |
| Highest |
| In Progress |
| SEV-1 (produces the Severity rate in the custom field) |
| 20 Jan 2023 (produces the Due Date in the custom field) |
Signature Variables | |
| User's name from Jira profile (default) or custom content from Personal signature settings |
| Project name (default) or custom content from Project signature settings |
| Contents of global Signature template (if set) |
| Anchor | ||||
|---|---|---|---|---|
|
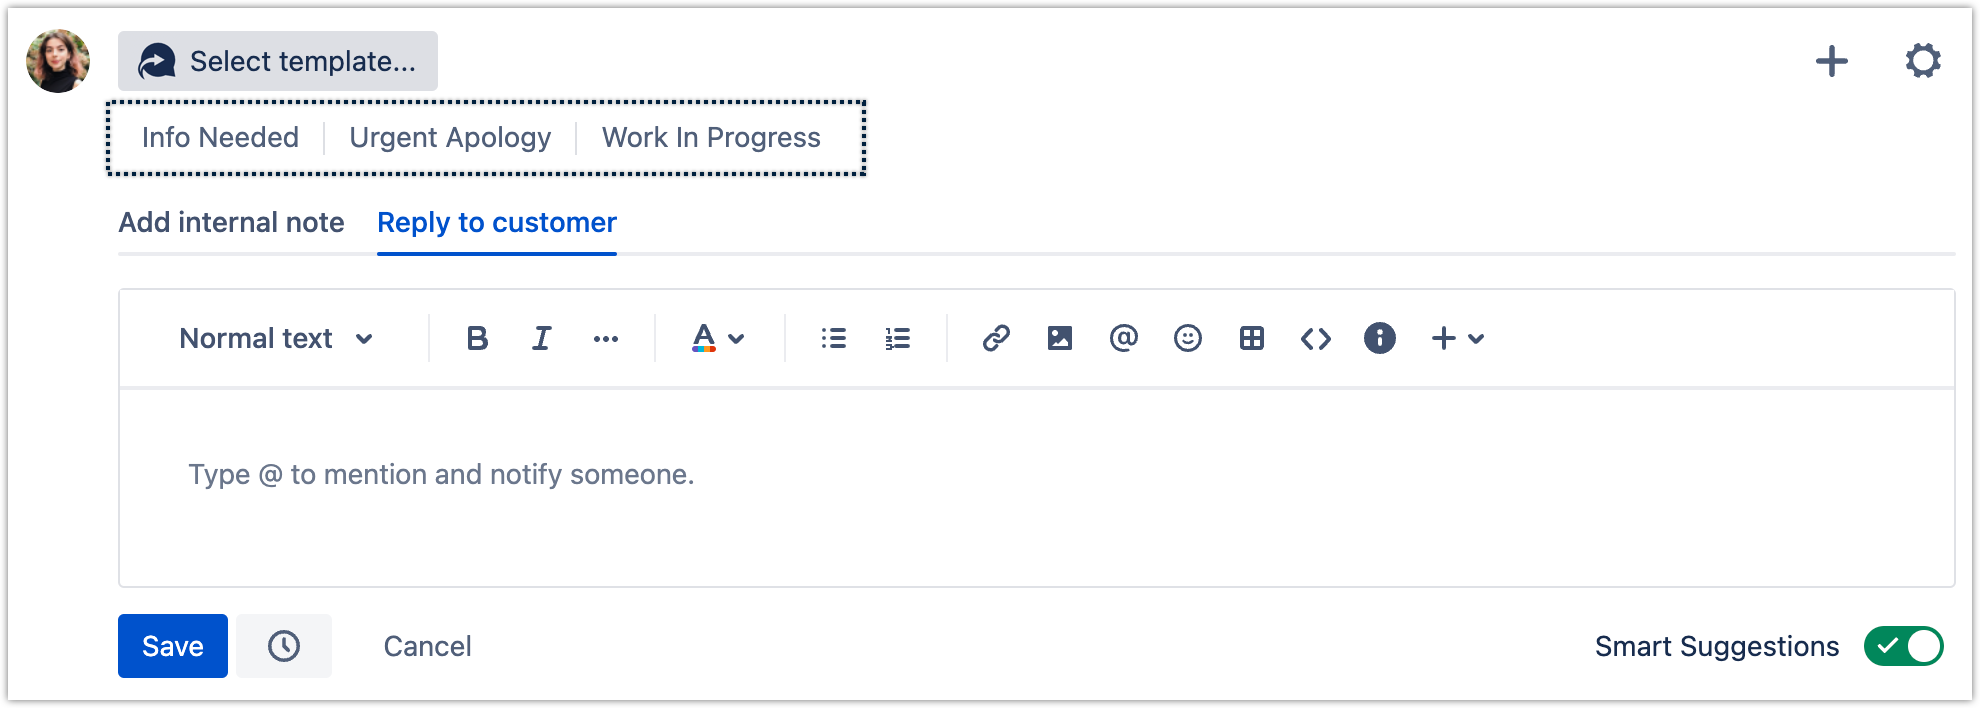
The Smart Suggestions feature can help you quickly find the right words for your situation. As you type, it suggests responses based on some predefined, commonly used phrases and other available templates.
The suggestions will appear as pale texts. Press the UP and DOWN arrows on your keyboard to go through different options, and press the RIGHT arrow to use one. You can turn off the Smart Suggestions toggle to not see suggestions.
-20230118-004814.gif?version=1&modificationDate=1674002902681&cacheVersion=1&api=v2&width=340)
The more you use this feature, the better its response suggestions will be. We recommend you keep it enabled for the best experience.Learn more about Smart Suggestions.
| Anchor | ||||
|---|---|---|---|---|
|
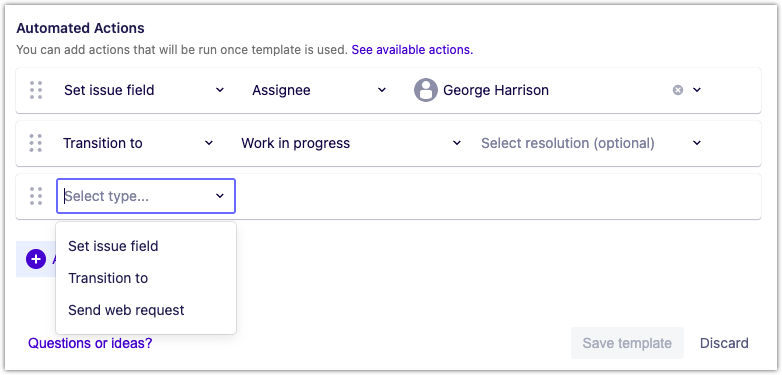
To save time and reduce the chances of human error, add an automated action that will be triggered once you send the template.
In Canned Responses Pro Templates for Jira, each template can include an individually triggered sequence of actions. These can be used in situations where you want to automate repetitive or routine tasks, as well as enforce a consistent process for handling issues. It’s possible to:
Transition an issue
Change field values
Trigger a web request
To external service (integrations, etc.)
To trigger Jira Automation
The actions are run in sequential order, one after another. If you use more than one template with actions while creating the content, all the actions will be queued and eventually run. When you insert a template with automated actions, these actions are scheduled to take place automatically after you save the content (comment or issue description). Before saving and running actions, you have the option to remove selected actions and prevent them from running at that particular time, giving you full control over the process.
For further information about automated actions and other examples, refer to its documentation.
| Anchor | ||||
|---|---|---|---|---|
|
Click the Save template button to save your template. It’ll then be available in the dropdown menu of the Canned Responses panel for easy insertion in future issues.
You can click the star icon to mark the template as a favorite. This will add the template to the quick toolbar, making it easily accessible for future use.
This feature is personalized, meaning that only the user who has marked a template as a favorite will see it in their quick toolbar. All of the templates still follow visibility scopes, but each user can choose to mark them as favorites to have them on hand, according to their individual style of work. Check out how the template will appear on issue view below:

That’s all you need to know to start creating smart templates that save you time and increase efficiency.
🖇️ Related Articles
| Panel | ||||||||
|---|---|---|---|---|---|---|---|---|
| ||||||||