This information is correct as of November 2021
The JSU team is pleased to announce that JSU will be compatible with Atlassian’s Jira Cloud Migration Assistant (JCMA) for app migrations. This means that for the first time, you’ll be able to automatically migrate most of your JSU workflow automations from your Server instance to your Cloud instance.
It is highly recommended to first test your migration on a different Cloud instance so that you may become familiar with the results, before proceeding to migrate your Server app-data to your production Cloud instance.
How to navigate to the Jira Cloud Migration Assistant add-on
It is recommended to always use the latest available version of the Jira Cloud Migration Assistant (JCMA) add-on by Atlassian. As of writing the latest version is 1.6.3. You can track updates to JCMA through Atlassian’s app migration https://developer.atlassian.com/platform/app-migration/changelog/.
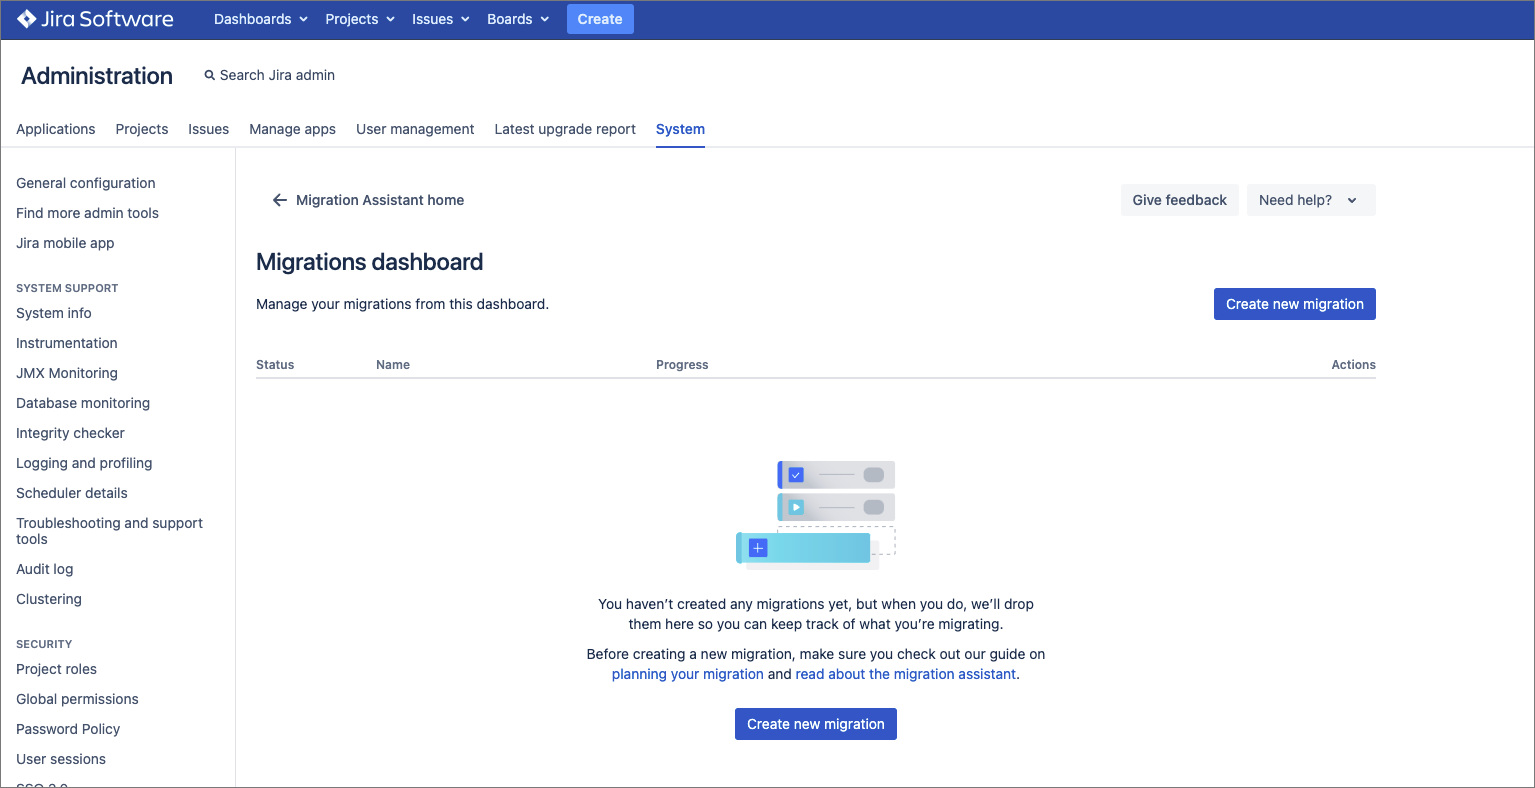
To begin preparing your instance for a migration to Jira Cloud, you first need to navigate to the Migrate to Cloud section of the Jira administration settings.
Select Administration
 > System.
Under IMPORT AND EXPORT in the left sidebar, select Migrate to cloud. The Migration Assistant home page is displayed.

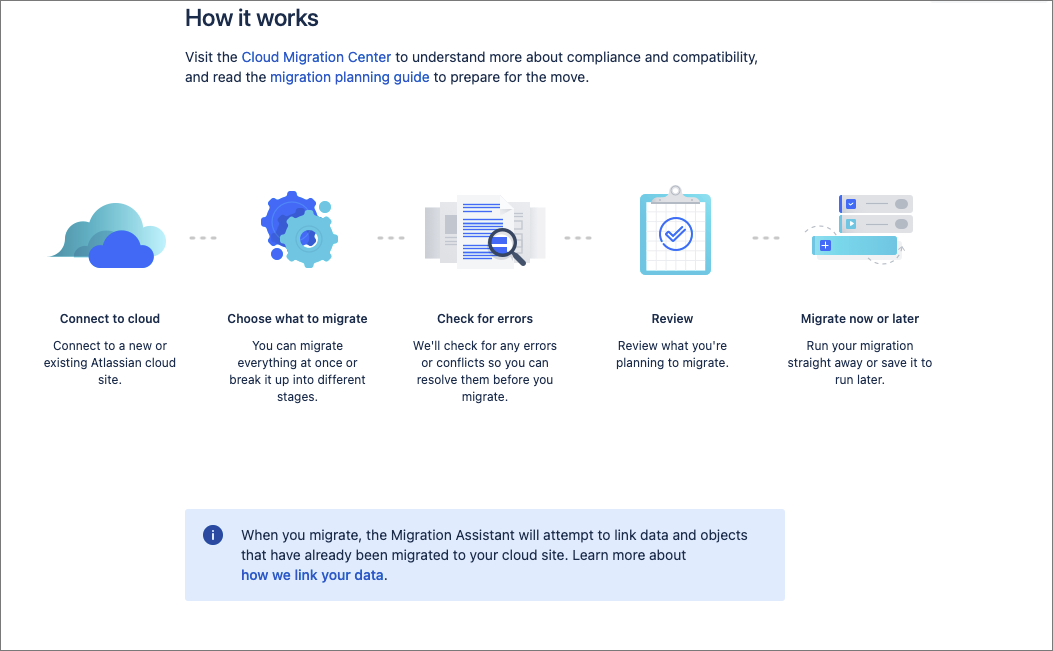
Before you can commence a migration, you need to complete the steps outlined in the JCMA tool to assess and prepare your apps. This guide will give a brief overview of how to do this with JSU. It is highly recommended to become familiar with Atlassian’s https://support.atlassian.com/migration/docs/jira-cloud-migration-assistant/ while preparing your instance and other apps for a Cloud migration.
How to include JSU in your app assessment
Assess your apps - you will need to select which apps you want to include in your migration. All apps must have a decision status selected before you can proceed to the next step.
Find JSU in the list of apps and select Needed in Cloud from the Status dropdown.
When you’re happy to proceed, select Done.
Prepare your apps - next, you need to link your Jira Cloud instance to the JCMA tool via the prompts. Select Choose cloud site to link your chosen cloud instance and navigate through the remaining preparatory steps, then click Done.

Migrate your data - when you are ready, on the Migrations dashboard, select Create new migration to begin your migration activity. Proceed through the corresponding prompts until you are ready to commence the migration.
On the step “Would you like to migrate your Apps?” - Select All to ensure JSU is included in your migration activity.
Review any possible errors relating to your migration before proceeding. Click Run to commence your Cloud migration which includes your JSU app data.
Reviewing the status of your migration
After starting the migration, you can review it as it progresses by returning to the Migrations dashboard in step 3. Your Jira data will be migrated first, followed by your app data.

Click View details to see more information on the migration activity.

The app-migration stage is the last step of the migration activity. When this stage has been completed you can expand to see more information, including a link to the JSU Cloud Post-Migration Report.

The post-migration report will show a summary of INCOMPLETE if any warnings or errors were found during the migration. JSU relies on the JCMA tool to move across any workflows, resolutions, transitions etc. to configure your workflow rules correctly on your cloud site.
Post-migration report and cleanup
Click the link in the expanded section to open a new tab with your post-migration report for this specific migration. To view any of your post-migration reports on your cloud instance go to Settings ![]() Apps > JSU Automation Suite for Jira Workflows > Reporting.
Apps > JSU Automation Suite for Jira Workflows > Reporting.

The examples on this page were created using our original beta Migration report.
.png?version=1&modificationDate=1686305897578&cacheVersion=1&api=v2)
From January 2023 our Migration report contains additional details and features to make it easier for you to identify and resolve any problems with your workflows post-migration. You can see an example of the new report in our release documentation.
The report now includes:
The rule name, workflow, and transition with links to take you directly to the appropriate pages in your Jira instance.
Sortable columns to help you organize the issues in a way that suits you best
A Resolved checkbox to help you keep track of problems as they are fixed
Looking at the post-migration report, we can see there are two warnings reported: one Missing resolution and one Missing transition.
These are because JSU couldn’t find a specific resolution and transition it needed to configure some features correctly on the cloud instance. This specific scenario is likely to be caused by one of three scenarios:
The JCMA tool didn’t migrate those specific resolutions and transitions for unknown reasons
The JCMA tool didn’t migrate those specific resolutions and transitions because they already exist on the Cloud site but with different IDs
The JCMA tool migrated those specific resolutions and transitions but in doing so gave them new IDs which don’t match the Server configuration
At this stage we can say that JSU has successfully performed an app-migration to the Cloud.
All that remains is the specific cleanup of workflow rules relating to any warnings identified.
Let’s look at the workflow rules side-by-side on both platforms: how they are originally on our Server instance, and how they look after being migrated to the Cloud instance.
Server

Our server workflow contains three JSU post functions, one of each for Linked Transition, Clear Field Value and Update Any issue Field.
Cloud

All three have been successfully migrated to the Cloud, but the Linked Transition has a visible error.
Our Cloud post function is missing a value for the Transition field, while the Server field contains the “Done” transition.
The Missing transition warning from the post-migration report, showed that a transition with ID “31” couldn’t be found. This is likely the missing field, so let’s fix it.
First, look at the specific configuration of this post function on the Server instance compared to the Cloud instance.
Server

Cloud

On your cloud instance, edit the misconfigured post function and ensure the correct values are added to the Transition values (in our case the same workflow with transition “Done” and ID “31”) and then click Update to save your changes.
.png?version=1&modificationDate=1686310540993&cacheVersion=1&api=v2)
After updating the post function, the error no longer appears. After you’ve resolved all issues on your workflow, don’t forget to publish your workflow.

You’ve now successfully migrated to Cloud with all of your JSU workflow rules included!
Feedback welcome
How did your migration go? Was this guide helpful? Still have questions? Please feel free to contact us through our usual support channels and we’ll be happy to assist.