| Excerpt |
|---|
Returns codes are different for validators, conditions and post functions. |
Writing Conditions
Writing scripts for conditions is very simple to do since the script will run in the issue context. Also, there is very little to do with a condition script since the user is not presented with an on-screen message when they are blocked by a workflow condition. For a condition script to work the script must return a Boolean value:
true - the user is not blocked and is allowed to see the workflow transition
false - the user is blocked and can not see the workflow transition
For example, with the code below all users would be blocked by the condition 100% of the time since it will always be false:
| Code Block |
|---|
return false; //to signal that condition is not fullfilled. |
Basic Condition Example
One of the most common ways to use conditions is to create rules based on some information about the user trying to execute the transition. The nice thing about most SIL scripts is they are also executed in the context of a user. This means it is easy to gain information about the specific user who executed the script. By using thecurrentUser()routine the username of the user who executed the script can be obtained.
User must be in a project role condition example
| Code Block |
|---|
string[] roles = userRoles(project, currentUser());

if(!arrayElementExists(roles, "managers")){
    return false;
} |
Understanding the code
In the first line of code an array variable called strings is created and the values are populated using the userRoles()routine r outine which provides a list of project roles that a given user is in. This routine takes two parameters, the project key for which to get the list of project roles for the user, and the second is the user who they should be gotten for.
| Code Block |
|---|
string[] roles = userRoles(project, currentUser()); |
Note that first parameter for the userRoles() routine is the word project. This is actually a standard variable that has been prepopulated by SIL with the value of the project from the current issue. So if the issue the user was viewing was TEST-123, the project variable would automatically have the value ‘TEST’.
Note that instead of using a username as the second parameter of the userRoles() routine the script passes another routine! This is actually acceptable and very common. The currentUser() routine will retrieve the username of the user viewing the current issue and pass that value to the userRoles() routine. Notice the currentUser() routine does not take parameters, this is because the value is automatically taken from the user who executed the script.
The next bit of code is the actual test for the condition. It uses an If statement and says if manager project role is not found in the list of project roles (take from the previous step) then execute the next line of code.
| Code Block |
|---|
if(!arrayElementExists(roles, "managers")){... |
Notice that there are no equality operators in the statement. It is not written like ‘if true’ or ‘if false’. This can be done because the arrayElementExists() routine returns a Boolean (true/false) value and we can take advantage of that. Writing ‘if(true == true)…’ is redundant and writing ‘if(true)…’ does the same thing.
Note that if the user was in the ‘managers’ role the arrayElementExists() routine would return a true. However, the script returns false. This is because of the explication mark in front of the routine. This mark, the not operator, reverses the meaning of the statement. This changes the statement to trigger only when the ‘managers’ role is not in the list of project roles for the user.
Next, we have the return code. If the ‘managers’ role is not in the list of project roles for the user then the user should be blocked from conducting the transition. To do this the script simply returns false.
| Code Block |
|---|
return false; |
Notice that the inverse of this statement is not accounted for. Meaning, there are no instructions in the script as to what should happen if the ‘managers’ role is found in the list of project roles for the user. There is no place in the script where it returns true. This is because it is implied. Condition and validator scripts are assumed to be true unless they specifically return a false value. This means you don’t need to write the true condition, only the false condition.
Condition and validator scripts are assumed to be true unless they specifically return a false value. This means you don’t need to write the true condition, only the false condition.
TLDR:
While that took a lot of explaining, the basics behind a condition script are very simple, if the check run in the script fails, return false, the user is then blocked. If not, do nothing, the script automatically returns true, the user is not blocked.
Writing Validators
Writing validators is very similar to writing conditions with one exception, the user is presented with a message to let them know why they have been blocked. The script for a validator is exactly the same as a condition but the return code has 3 values instead of just 1.
Pass/fail - If false, the user is blocked. If true, the user is not blocked and allowed to complete the transition
Field - Assuming that the value contained in a specific field determined if the script should pass or fail, the field value can be used to pass the validator the custom field under which the error message should be displayed.
Message - If the script fails this message will be presented to the user.
Basic Validator Example
For this example lets use the same script that was used in the condition example. This will help illustrate the differences between the two scripts.
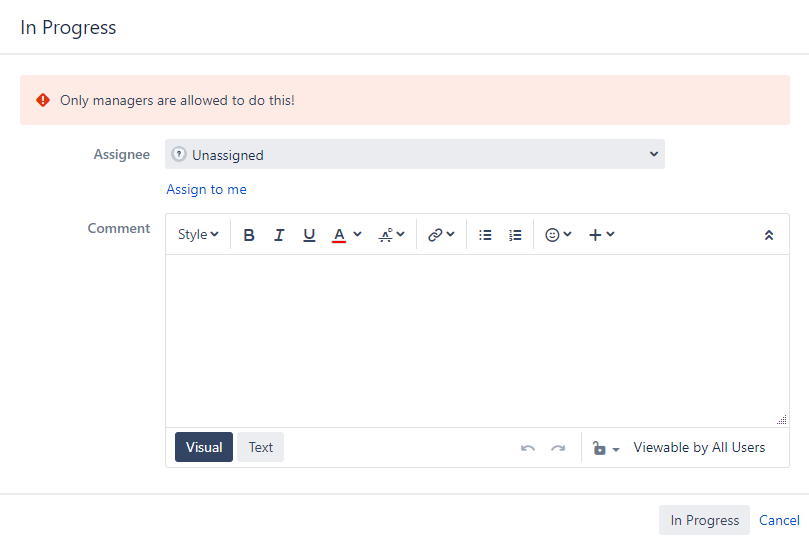
User must be in a project role validator example
| Code Block |
|---|
string[] roles = userRoles(project, currentUser());
string errMsg = "Only managers are allowed to do this!";

if(!arrayElementExists(roles, "managers")){
    return false, errMsg;
} |
Understanding the code
On line 2 we have a text string. This text is the message that will be displayed to the user.
| Code Block |
|---|
string errMsg = "Only managers are allowed to do this!"; |
On the 5th line we have the modified return statement. It returns the pass/fail value and the user message.
| Code Block |
|---|
return false, errMsg; |
But, but I thought there were supposed to be 3 parameters and not 2!
That’s ok, the second parameter is actually optional. If included, the error message will display beneath the custom field indicated. If not, it will be displayed at the top of the window or screen.
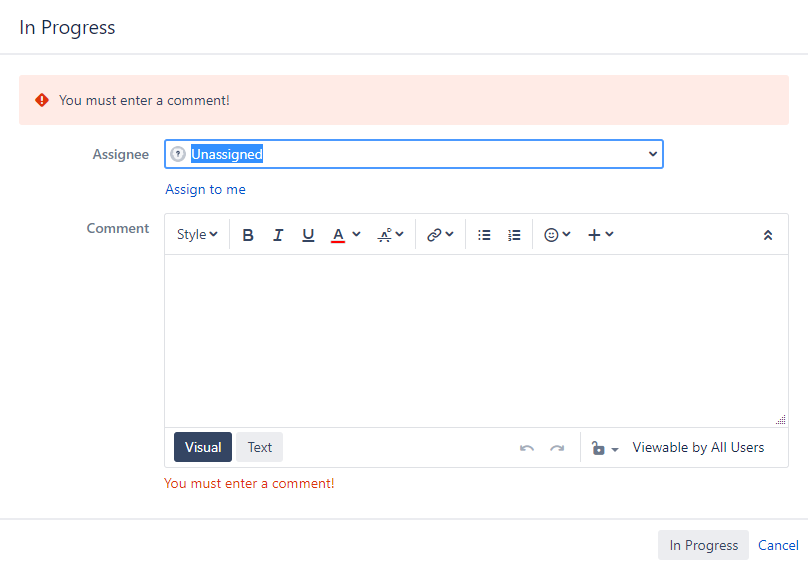
Field message example
Just for comparison, lets look at an example that uses all 3 return values.
| Code Block |
|---|
string errorMsg = "You must enter a comment!";

if(!hasInput("comment")) {
   return false, "comment", errorMsg;
} |
Understanding the code
On line 3 we are introduced to the hasInput() routine. This routine and another, getInput() are special. These routines use the value of the field on the transition screen, not the value of the stored value of the field.
| Code Block |
|---|
if(!hasInput("comment")) {... |
Normally, in SIL, when referencing a custom field you are getting the value stored in the issue. When a user has a transition screen displayed in front of them and they type in a value (like the screen below) and they were to try to press the button to complete the transition; understand that the values entered in the transition screen are not saved against the issue, the do not exist in Jira, they only exist on that users screen which is in memory on their computer or mobile device!
Why, I don’t understand…
To put it another way, when a user enters a value in a transition screen (like the one below) and hits the 'In Progress” button (for this example), the user is trying to SAVE the values in the issue. If they are not allowed to complete the transaction, those values will not get saved.
Normally, the SIL language gets the SAVED values of variables. If the user didn’t save the value or was not allowed to save the value then the SIL script can not access the value because it was never saved and does not exist.
TLDR: The hasInput() and getInput() routines are special, they can read the value from the transition screen and not the values stored against the issue.
One the 4th line of code we can see the return statement with all 3 values. The second value is ‘comment’ this means that the error message will also be displayed beneath the comment input.
| Code Block |
|---|
return false, "comment", errorMsg; |
Writing Post Functions
post functions are the real action on the workflow, and they are executed in the final stage to the transition. Here, you can add a script that will actually do something. They have no special requirements on returns and they always execute in the context of the transitioned issue.
A postfunction may be as simple as:
| Code Block |
|---|
assignee = currentUser(); |
… or as complex as you might want it.
Unlike validators and conditions the postfunction is the only place in the workflow where you are allowed to modify the issue!
Return Codes
Returns codes are different for validators, conditions and post functions.
For Validators
| Code Block |
|---|
return false, "assignee", "We have failed, assignee is not ok"; |
The first field tells us that we have failed, the second indicates the field, the third is the message that will be shown on the UI. Prior to 5.8.0.2, the filed name must be a "bare" name. That means that it should comply with the name given to the HTML objects displayed (e.g: for customfields it will be customfield_xxxxx). You can inspect the HTML source of the edit screen to see the "bare" name of a field. For versions greater than 5.8.0.2, you can use the alias or the customfield name.
Starting with version 5.8.0.2, the validators accept also as return an associative array of messages:
| Code Block |
|---|
string [] msgs; msgs["summary"] = "I do not like the summary"; //field level, it has a key msgs["cftext"] = "This text field is what I dislike most"; msgs["aliasForANumberField"] = "Numbers? Who needs them ?"; msgs += "This form has 3 validation errors.\nPlease correct them and resubmit it."; //global message, it may span multiple lines return false, msgs; |
Line breaks may be added by placing \n in the messages:
| Code Block |
|---|
return false, "We have failed!\nAssignee is not ok"; |
Please note that line breaks works nicely for global messages, and not for the field level messages (only the last line may be shown in the UI for the field messages).
For Conditions
| Code Block |
|---|
return false; //to signal that condition is not fullfilled. |
Just tell Jira this condition is not fulfilled.
For Post Functions
| Code Block |
|---|
return; |
return ends the program, any values are ignored.
| Note |
|---|
NoteWhen writing post functions, conditions or validators for the Create issue transition, ensure that the SIL program is the last step of the transition. This is necessary because we need Jira to create the actual issue and save it to the database using the input parameters before we can access it. See Order Warning for more details. |
| Note |
|---|
NoteIn general, it's a good idea to place your post functions after all standard post functions. This allows the issue to be re-indexed and the data to be stored in the issue correctly. If the post function is applied to the ‘create’ transition then the new issue has never been indexed and the index does not exist until this index step has run for the first time and no data may exist for the issue at this point. That is why it is always best for the post function to be after all the standard post functions. See Order Warning for more details. |
Parameters : the Transition Id
All post functions, conditions and validators receive as parameter the transition ID (starting with version 5.8.0.0). It can be accessed as the first parameter to the script, so you can centralize control for all the WFs conditions, for instance:
| Code Block |
|---|
int transitionId = argv[0];
//ids below are bogus, please check within your WF
switch(transitionId) {
  case 21:
    //do something for * -> In Progress
    result = ....
    break;
  case 31:
    //do something for * -> Done
    result = ....
    break;
  default:
    //.......
    result = ....
    break;
}

return result; |
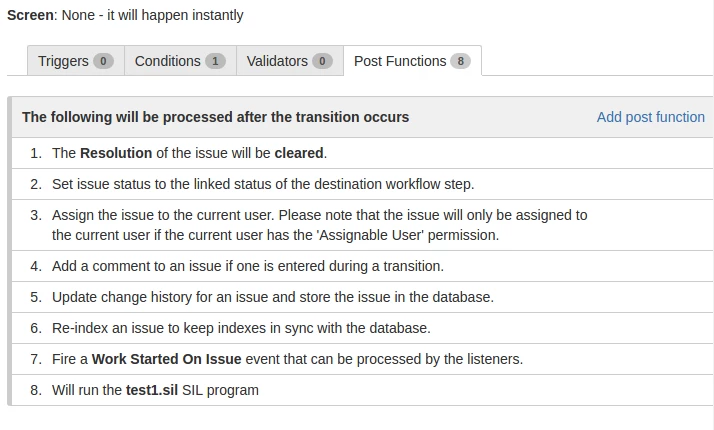
Workflow View
This view will help you browse through your workflow without having to open the program every time to see what it does.
On the first line we have the name of the SIL program. After that, you have a short description of the program, which you can write by commenting on the first lines (max. 3 lines) in your code. For example, the program you see on the right contains "//Your SIL code should go in here" on the first line.
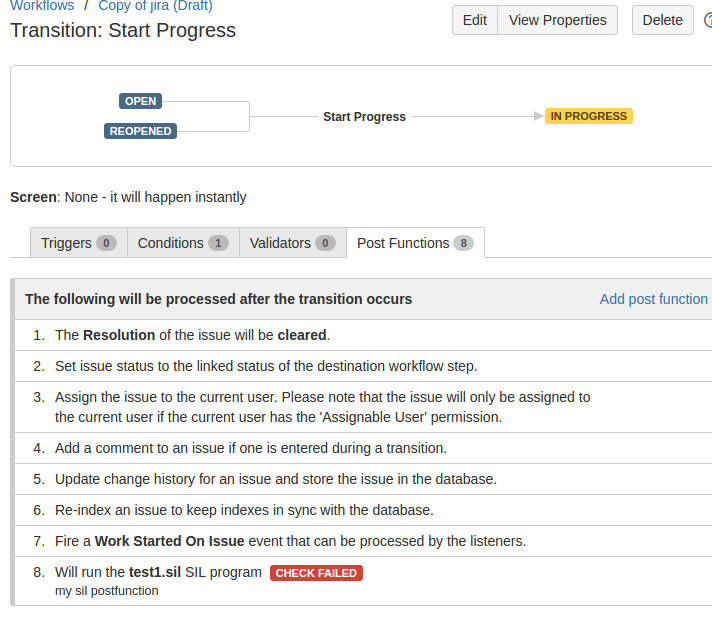
Warnings
You may notice several warning messages displayed in the work view. These messages do not necessarily mean that there is a problem, however, the messages are trying to warn you that a potential problem may occur.
Unpublished Warning


The UNPLUBLISHED warning (1) reflects the overall status of the workflow as being unpublished. You can see this in the standard Jira warning message above (2). This is just a reminder that changes will not take effect until the workflow is published and provides another action button (3) to publish the workflow. This can be useful if the list of post functions is long and the standard warning and button do not appear because of scrolling. If the workflow is not being edited this warning will not appear.
| Anchor | ||||
|---|---|---|---|---|
|


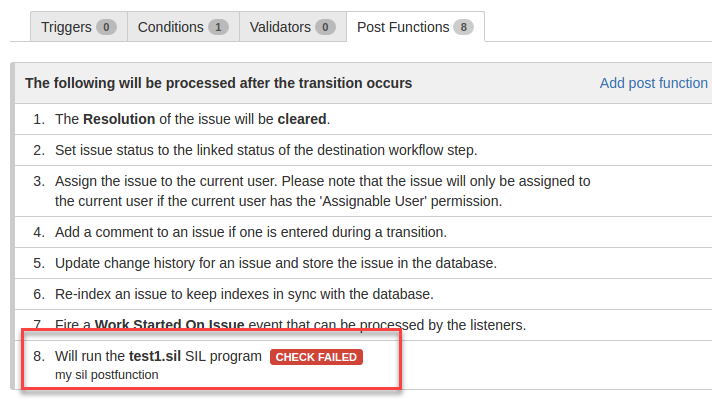
The ORDER WARNING (1) can be present when the post function is not the last item on the list. The order of the post function execution is not always a problem. However, one example of when it can be a problem is during the Create Issue transition. This is a standard transition that executes when an issue the first created and can not be removed. Notice that the issue is not created until the second post function (2). This means that the SIL post function could possibly execute before the issue is ever created. While this is not always a problem, depending on the contents of the SIL script, it could mean that data from the issue will be unreadable because the issue does not yet exist. To help prevent such problems a button (3) was added to move the SIL post function to the bottom of the list.
| Note |
|---|
NoteWhile the SIL post function does not need to be at the bottom (necessarily) it is one of the safest positions for it to be placed. This is because some data might not be readable until after the issue is indexed (see post function #3 in the image above). This usually only occurs, again, during the Create Issue transition. The reason for this is that until this post function executes no index will exist for this issue since it has never been indexed. Once the index is created the data is readily available to be read by SIL even if the data is changing as part of the transition (usually). |
| Note |
|---|
NoteIn general, it's a good practice to always lace your post functions after all standard post functions. While it is usually only important for the Create Issue transition making this a best practice will help ensure the post function operates properly. |
Errors
Finally, you have the ERROR NOTIFER which tells you whether the program is correct. If there are any errors, open the program for a more detailed description of the cause. If the program is correct, this line will be blank.
See also
Contents
| Table of Contents | ||||
|---|---|---|---|---|
|